Many who use the popular image software Midjourney have had problems with Midjourney distortion. Human hands, arms, feet, and other body parts are often totally unrealistic. Extra fingers, matchstick arms, and feet disappearing into a blur are common.
Yes, there are explanations for why this happens. Regardless, this flaw makes folks waste significant time getting Midjourney to generate images of people that don’t include these artifacts.
After spending many frustrating hours, either trying to dream up prompts that avoid these problems or cropping out distorted portions of images, I’ve finally developed an approach that minimizes Midjourney distortion of body parts.
In a typical in-person conference breakout session, participants divide into small groups to discuss one or more topics. Each group records members’ thoughts and ideas on one or more sheets of flipchart paper. At the end of the discussions, groups post their papers on a wall and everyone walks around reading the different ideas. Facilitators call this a gallery walk. Here’s a tip to improve breakout gallery walks.
Why use gallery walks?
In the past, it was common for small group work to be “reported out”: a representative from each group verbally shared their group’s work with everyone. If there are many groups, this takes a while, and there’s typically a fair amount of repetition, which makes it hard to maintain focus. In addition, if the groups are covering multiple topics, likely, some or most of the reporting will not interest attendees. In short, reporting out is tiring to take in and inefficient.
A significant advantage of gallery walks is that participants can easily concentrate on the topics, thoughts, and ideas that interest them. If a flipchart page is of no interest, it can be ignored. Also, it’s simple to customize a gallery walk to meet specific wants and needs. For example, if there are experts on a particular topic, they can stand near their flipchart notes and answer questions or support discussion. Gallery walks allow ongoing interaction around the captured ideas, which isn’t possible during “reporting out,” a broadcast-style activity.
And this leads to my tip…
My tip to improve breakout gallery walks
You can improve the effectiveness of a gallery walk by adding one small step before it starts. Ask everyone to pair up with someone they don’t know and walk the gallery together while discussing what they see. When you do this, each participant:
Gets introduced to and learns about someone new.
Gains new perspectives on the topics under discussion.
Continues to actively learn about the topics after the end of their small group.
In essence, pairing participants increases the reach and impact of the breakout session by extending connection and interaction into the concluding gallery walk.
As usual, lightly ask participants to share in pairs. I like to think of such requests as giving people permission to do something they might want to do but feel a little awkward asking for it. If folks want to go around with someone they know or have just met, or decide to walk as a trio or alone, respect their choices.
Want a simple way to improve meeting session learning? Provide a shared Google Doc where all participants can take notes, ask questions, and get answers!
A shared Google Doc is an easy, familiar tool you can use to facilitate and improve real-time conversation and learning around presented content. And when the session is over, participants have a convenient archive for reference.
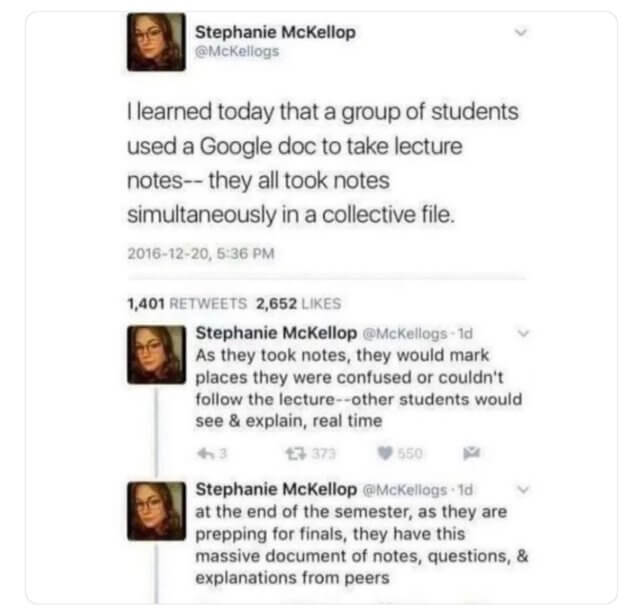
The idea was sparked by discovering this deleted tweet thread. “I learned today that a group of students used a Google doc to take lecture notes–they all took notes simultaneously in a collective file.”
“As they took notes they would mark places they were confused or couldn’t follow the lecture–other students would see & explain, real time.”
“At the end of the semester, as they are prepping for finals, they have this massive document of notes, questions, & explanations from peers.” —from a 2016 since-deleted tweet thread
Now this isn’t an original idea. I’ve used collaborative Google Docs at meetings since 2010 to collaboratively brainstorm and solve a problem, for scribing answers to The Three Questions, and to capture the pluses and deltas in a group spective. And a quick web search will discover numerous examples of teachers who use this technique in elementary through college classrooms.
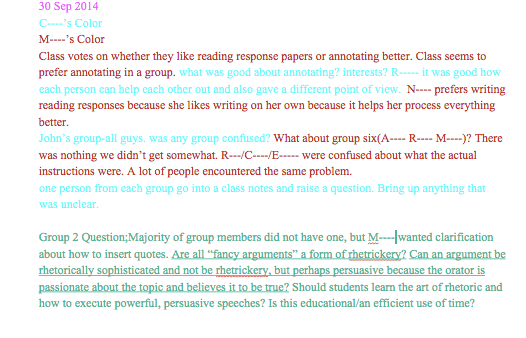
Here’s an example from a community college class…
A group of us did something similar in 2014 when we live-blogged the PCMA Convening Leaders conference. Offering the same technique to all participants at meeting sessions may be new. (If it isn’t, let us know in the comments below!)
Create a short link to each Google Doc. I use a link that combines an abbreviation for the event with a short version of the session title. For example, an “Improving Diversity, Equity, and Inclusion” session at the 2022 XYZ conference might have the link tiny.cc/XYZ2022ImproveDEI.
Add the session title and the short link to the top of the linked Google Doc.
Repeat for all meeting sessions.
For meeting owners
Before the meeting publicize that meeting session participants can and are encouraged to create collaborative notes on each session. Right before the meeting provide participants with a list of links to the collaborative docs for each session. Also, ask session presenters to display the URL for their session’s Doc and encourage participants to use it.
For session presenters
Even if meeting organizers haven’t adopted the above approach, there’s nothing to stop presenters from incorporating this technique into their sessions.
After the meeting or presentation
Change the access for each Doc to “viewer” (people with the link can see the document but not edit it) and then make the session notes available appropriately. You could share them on a private website, email the Doc links to participants, or use any other distribution method that fits.
What do you think?
If you use this method to improve meeting session learning or have ideas on extending it, please share your experience in the comments below.
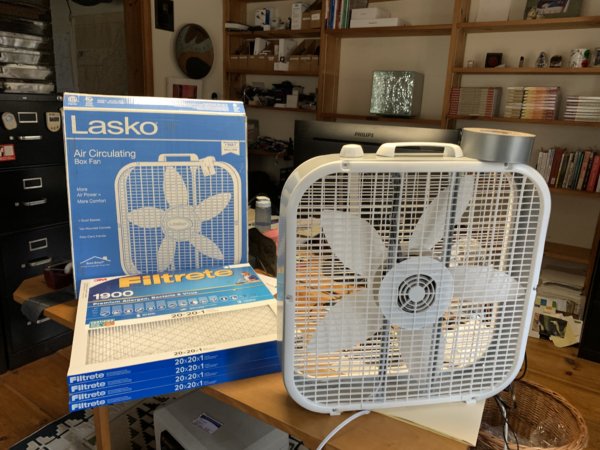
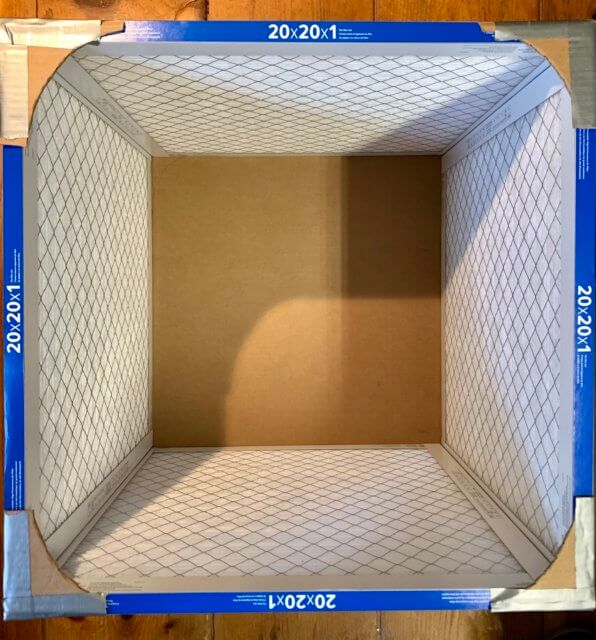
I just built a Corsi-Rosenthal Box. You might be thinking “What?” Well, it’s a simple and inexpensive DIY air filtering device that helps remove airborne viruses, wildfire pollution, pollen, dust, etc. from indoor air. Of particular note: the filters used are good enough to remove COVID-19 aerosols from contaminated air. Also, it’s incredibly easy to build and inexpensive. My Corsi-Rosenthal Box took less than an hour to make using the readily available supplies shown above. And it cost just $94 plus a dollar or two for duct tape.
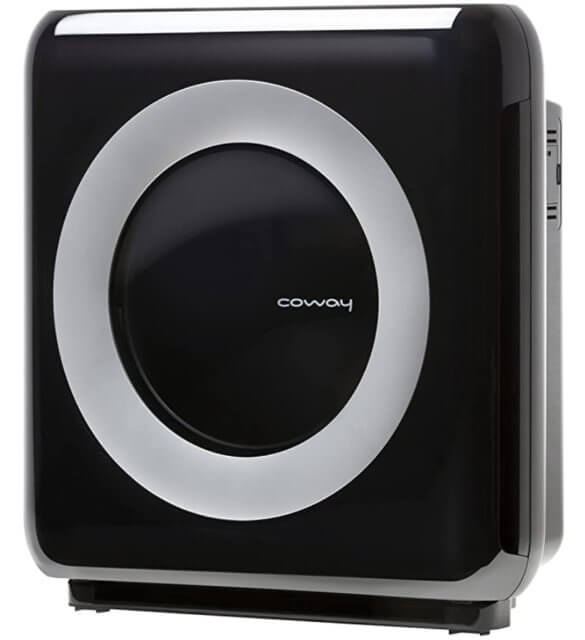
That compares favorably with the $230 sleek Coway Air Purifier, shown below, that I purchased at the start of the COVID-19 pandemic. Especially since the latter is rated at ~250 cubic feet per minute (CFM) while mine provides ~350 CFM.
My air filter is 40% of the price of the Coway yet provides 40% more ventilation!
To be fair, mine is larger — and uglier. Here it is!
Even though I’d never made one before the air cleaner took less than an hour to put together. If I did it again, I think I could build one in less than 30 minutes.
Materials, tools, and basic construction
All the materials I used are shown above. Here’s the list:
The only tools I needed were a Swiss army knife, scissors, a pencil, and a loop of string. (Oh, and a thumbtack.)
Because there are already good resources available for choosing components and building a Corsi-Rosenthal Box, I’m not going to replicate them here. Instead, here’s what I found most helpful:
These resources cover everything you need to know to build inexpensive and effective air cleaners, plus a little interesting history of how they came to be.
Tips on building a Corsi-Rosenthal Box
While building my box I learned some little details that aren’t covered in the core resources above. None of them are vital, but they might help you. Here they are:
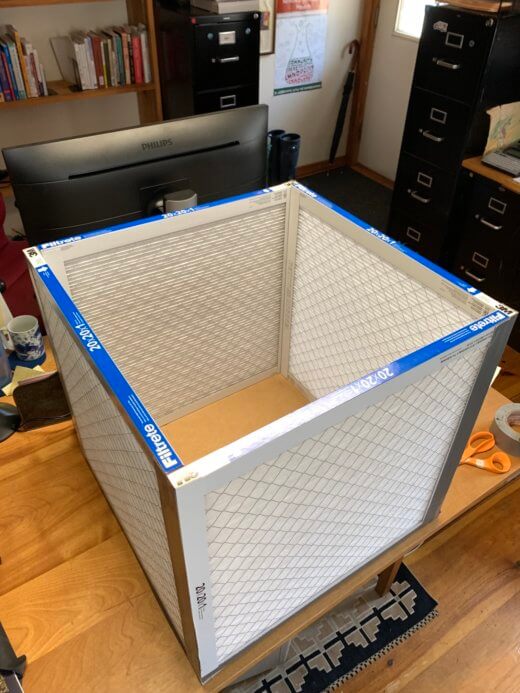
Making the box as square as possible
How should the four filters be duct-taped together? See the picture above, which shows the seam arrangement I used to create a square shape. I found that 2″ duct tape worked well for the entire project.
You probably don’t need extra cardboard!
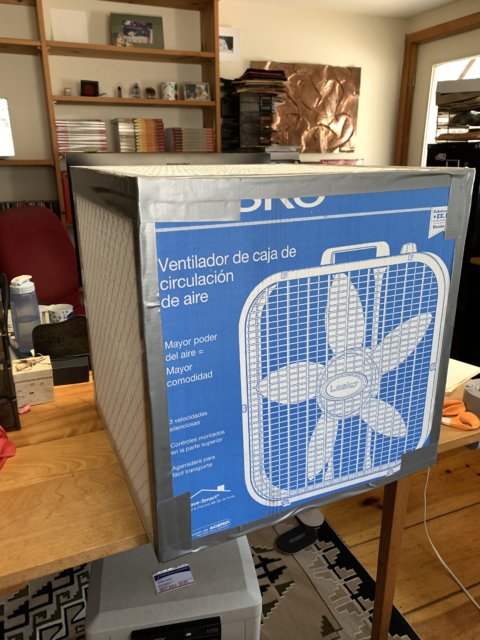
I purchased my fan and filters online, and both got shipped in boxes that are the perfect size to provide the cardboard you need. I used the Lasco fan box for the box base (see below), as well as four pieces needed to seal the corners of the fan mounting and the fan shroud (see next two sections). Very little cardboard was left!
Note that I sealed the bottom of the box along the filter edges and added four additional short strips of duct tape at each corner to reinforce the construction.
Creating four cardboard corner arcs to seal the fan mounting and the fan shroud
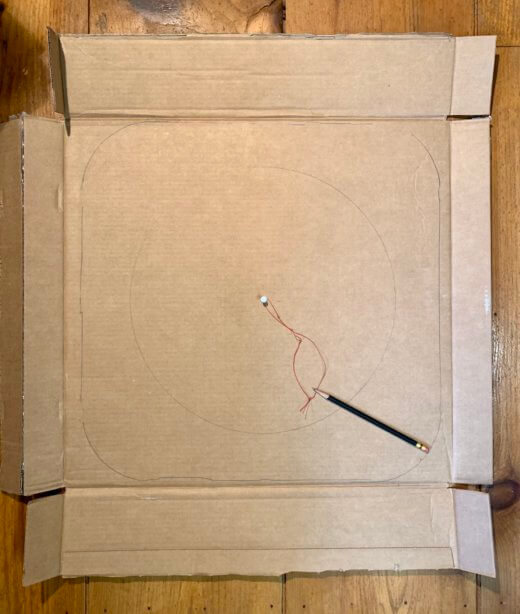
Here’s how I marked up the other side of the Lasco fan box to create four corner arcs that sealed the fan mounting and the fan shroud (see next section).
I placed the fan in the center of the cardboard and drew around its edge, creating the outside pencil line as shown below.
After removing the fan, I used a tape measure to find the center of the cardboard and inserted a thumbtack. Then I made a loop of string to draw a circle to cut out for the air exhaust portion of the fan shroud. (Look at the earlier photo of my finished unit to see what the fan shroud looks like.) The right length for the loop will depend on the fan you use. Here are the optimum fan shroud openings (with the 3M Filtrete 1900 filters I used) for two common fans:
So for my Lasco fan, I used a 15″ loop of string to draw a central circle with a 7.5″ radius.
After marking the cardboard I cut the four fan seal corner arcs from the cardboard corners with my Swiss Army knife and duct-taped them in position as shown below.
I then cut out the fan shroud.
Final assembly
All that remains at this point is to place the fan on the top of the box and seal it to the filter edges and the corner cardboard arcs with duct tape. Finally, tape the edges of the fan shroud to the fan.
You’re done! Here, again, is the finished unit.
This Corsi-Rosenthal Box is quiet, even on maximum fan speed, and noticeably more powerful than my commercial Coway unit. I live in a very airtight home — my CO₂ meter shows significantly higher readings when just the two of us are there. So I am happy to have this second unit available when folks visit. Building it was fun and easy. Recommended!
After years of trying many tools, here are my two favorite free easy ways to create graphics for blog posts and presentations if you’re not a graphics wonk. (Note: I am not a graphics wonk.)
I’ve written over eight hundred posts on this blog over the last fourteen years. As they tell you in SEO School, every post has at least one image. I often find an appropriate image on the web, but sometimes I feel inspired to create a graphic that fits better.
In addition, I frequently present at meeting industry events and to clients. Good presentation graphics can help communicate what I’m trying to say and strengthen my message.
Are you also “not a graphics wonk”?
I think there are a lot of people like me who have difficulty easily creating even simple graphics. My problem is that I simply don’t use “professional” graphics creation tools enough to be able to reliably memorize the variety of techniques, tools, and processes needed to speedily turn what I visualize into reality.
My graphic designer, whom I happily hire for complicated stuff, can quickly create perspective drawings, remove unwanted photo elements, and tone down someone’s bright clothing. For me, attempting any of these things takes a few hours on the web figuring out how, and making lots of mistakes along the way. The next time (if ever) I want to repeat the process I’ll have likely forgotten how to do it.
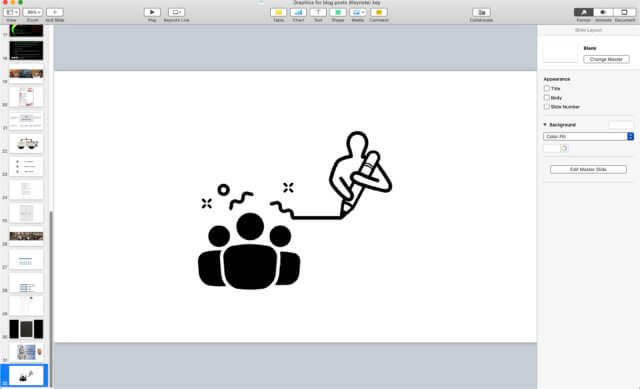
The graphics creation software I use most frequently comes free with Apple devices: Keynote.
Apple pitches Keynote as presentation software, and it’s an excellent tool for that. But it also has all the desirable features I listed above, so it’s perfect for quickly putting together a blog post graphic from a few external images plus some internally generated vector graphics and text. The alignment capabilities are especially nice: Keynote often seems to read my mind and pop up just the alignment guide(s) I might need.
I store a library of all my graphics in a single Keynote document, one slide per graphic. It’s easy to scroll through the slides and find an old graphic that can quickly be copied onto a new slide and modified as needed. Exporting a slide to a high-resolution jpeg (well, high enough for web or presentation purposes) is straightforward.
One feature it doesn’t have is rotating objects a precise amount (flipping horizontally or vertically is included). I occasionally need rotation capabilities for creating more complex (for me) graphics like a circle of chairs. If you need this capability, check out my bonus suggestion below.
For creating the kinds of graphics I’ve described, this software just works. The user interface is intuitive; I’ve never needed to research how to do anything I wanted to do. For the rare occasions I’ve attempted something (by my standards) really complicated and been stymied, I use the suggestion below.
Anyone with a web browser can use the best tool I’ve found for quickly creating simple graphics online: Canva. The software has a free plan that has been perfectly adequate for my modest needs. The trick to using it is to ignore the features that you don’t need — the free and paid templates and the galleries of free and paid images. Instead, start with a blank custom-size graphic workspace and use the drag-and-drop editor with your own graphic elements and perhaps a few basic objects.
Here’s an example of a graphic I made with Canva:
A couple of logos and some lines, and bingo! another graphic for another blog post.
Canva is especially helpful for creating a custom-sized graphic that’s filled perfectly with your desired content. You can do this in Keynote, but it’s a bit more fiddly.
So there you have it. Two free easy ways to create graphics for blog posts and presentations. But wait, there’s more!
Bonus resources
To reward you for reading this far I want to mention two other invaluable graphics resources. They both cost money, but not very much.
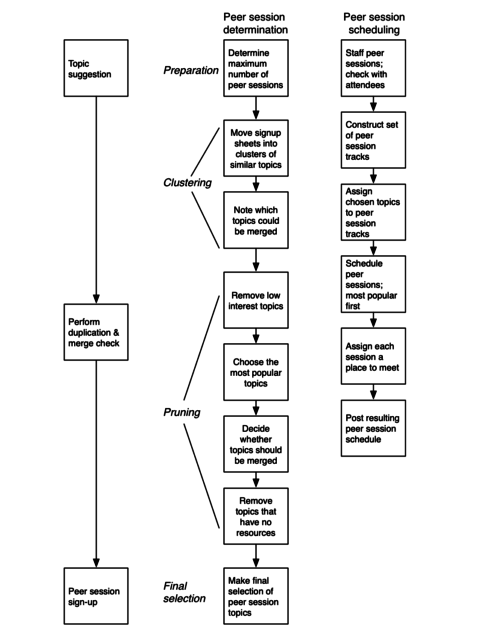
For more complicated graphics I use OmniGraffle. Here’s an example of the kind of graphic that is easy to create in this program:
OmniGraffle shines working with vector graphics. Diagrams like the above are easy to create because the program supports “connected objects”. I also find the program useful for drawing event room sets when you have to start from a venue’s floor plans downloaded as graphics.
OmniGraffle Standard (the version I use) costs $149.99, though education and volume discounts are available. Pricey but when you need it it’s worth it!
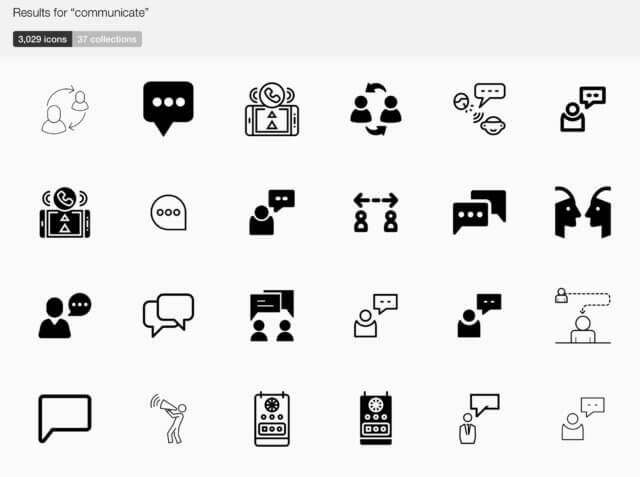
Finally, there’s Noun Project. This gem describes itself as “Icons for Everything: Over 2 million curated icons, created by a global community”. For $39.99/year you get unlimited royalty-free large SVG & PNG icons arranged in a searchable catalog. Noun Project is perfect for icons that represent abstract concepts, like communication [3,029 icons]:
or passion [1,567 icons]:
If you read my posts regularly, you’re likely to recognize some of the graphics I’ve made using icons from this extensive and ever-growing collection. You’re likely to find what you need here. Recommended!
Got recommendations that make creating graphics a snap for the graphically challenged? Share them in the comments below!
When you need professional help, how do you hire the best professional help?
Countless experts — accountants, plumbers, doctors, lawyers, and meeting planners — will take your money in exchange for advice or services. So, when it’s time to minimize your taxes, modernize the bathroom, diagnose that stabbing stomach pain, draft a complex contract, or organize multiple regional conferences — in short, get help with something you can’t do yourself — how do you choose great help?
You need a new kitchen sink. How can you determine whether someone who says they’re a plumber really knows what they’re doing?
There’s a simple reason why it’s tricky to pick great professionals. If you need help, obviously you lack crucial knowledge or experience. So when you seek help, you don’t know if someone who claims to be able to help really can!
Don’t despair! Here are the two essential steps to take to hire the best professional help.
Ask for and check references
Everyone knows that you should ask for references for a professional who’s going to do work for you. Unfortunately, knowing you should do something doesn’t mean you will actually do it. How often do you ask for references from a professional you’re planning to hire? Do you ask a potential builder? An accountant? A doctor? In my experience, I am rarely asked for references.
In addition, many people ask for references but don’t check them! You may think professionals will only give you the names of people who are satisfied with their services. While that’s usually true, talking to references will invariably turn up useful information. For example, you may discover that a plumber does good work but doesn’t finish in a timely fashion. Or an attorney writes competent contracts but his drafts need to be carefully checked to make sure that changes you request are actually incorporated. It’s common to hear information from a reference that immediately makes you decide not to employ the professional.
So getting and checking references before hiring is an essential step if you want to minimize unpleasant surprises. These days, crowd-vetted online sites like Angie’s List and houzz provide a helpful starting place, but you can’t beat talking directly to clients of professionals you’re considering.
See if they’ll say, “I don’t know”
My mother had an unusual set of medical symptoms. Unfortunately, she picked a doctor who was unable to admit that he didn’t know what was wrong with her. Instead, he told her that she had multiple sclerosis, which caused her much emotional upset. Years went by without the relapses or progressions normal to her illness. But she refused to believe that his diagnosis was wrong. Finally, I called him up and confronted him, and he admitted that she did not have the disease. Years of suffering could have been avoided if we had ascertained at the outset that he was incapable of admitting that he didn’t have all the answers.
Checking to see if a professional will say they don’t know when they actually don’t is an important hiring step that is rarely performed. Interview the professional and ask them questions about the work you want them to do. Listen carefully to how they respond to your questions. You are looking for them to show that they know the limits of their abilities and that they are willing to share their limits with you.
If necessary, ask whether they can do something that is a little outside their stated expertise and listen carefully to how they respond. If you hear an unwillingness to admit that they are not able to fulfill your request, you are receiving an important warning. Ignore it at your peril!
Choosing professionals who are aware of and clear and honest about their own limits ensures not only that they can actually do the work you need, but also that they will let you know when they are unequipped to handle any problems. These are the people you want to work for you.
One more thing
Know your own limitations, and make sure you ask for help when you can’t solve a problem by yourself!
That’s it!
Faithfully execute these two simple steps when choosing professionals and you’ll avoid the common problems that occur when obtaining help with life’s challenges. These must-do steps have made it possible for me to hire the best professional help for years. I hope they help you too.
Simply print copies of your event’s marketing poster, logo, or website main page on white poster stock (see illustration above). Post one copy for each person to receive appreciations, matched with a name card, on noticeboards or tables located in a prominent spot in your venue, and provide some pens nearby. Then, publicize the posters a few times throughout the event and ask attendees to write appreciations for the people posted.
You can see the heartwarming poster I received above. I’ve permanently posted it on my office wall. Every time I look at this poster, I’m reminded of the meeting and the kind plaudits and thanks I received.
At the end of the meeting, remind recipients to pick up their posters before they go!
One more suggestion. Supply cardboard tubes so that recipients can bring their inexpensive appreciation poster safely home. As you can see, mine got a little wrinkled in my suitcase—but I’ll treasure it nevertheless!
Here’s how to delete ALL mail messages from iPhone/iPad in one step. Yes, there is a way to delete all your unwanted iPhone/iPad emails from the Mail app in one step! No more left-swipe: tap Trash for every individual message. No more Edit: tap the single open circle next to every individual message and finally tap Trash. And you don’t need to jailbreak your device.
If you leave your iDevice on for a few days and come back to find a few hundred messages on it that you’ve already downloaded elsewhere this trick will save you time and irritation. I didn’t discover the method—it’s far from obvious—but found it on one of many Apple discussion threads bemoaning this irritating hole in Mail functionality.
Updates
GOOD NEWS UPDATE [added October 3, 2015] IOS 9.0.2 finally displays a “Trash All” button after Edit is pressed! If your phone won’t handle 9.0.2, the following procedure is often successful; read the comments for a detailed description of hundreds of people’s successes and failures.
BAD NEWS UPDATE [added September 25, 2016] IOS 10 has removed the “Trash All” button. Who knows why? The procedure listed below (the original 2014 post) still works for many people.
GOOD NEWS UPDATE [added January 5, 2020] IOS 13.3 allows you to “Select All” your emails and then touch “Trash” to delete all selected emails! If your phone can’t be updated to this IOS version, the following procedure is often successful; read the comments for a detailed description of hundreds of people’s successes and failures.
It works! I present to you this great tip from shashbasharat found on MacRumors (slightly edited for clarity).
How to delete ALL mail messages from iPhone/iPad in one step
How to delete or move ALL emails at once on a non-jailbroken iPad or iPhone
It took me weeks of research to figure out finally how to decode this yet another secretive secret of Apple. There is a perfect way of deleting ALL emails at once without jailbreaking your iPhone or iPad…and here it is:
If any of your messages are marked as unread: Open Inbox >> Edit >> Mark All >> Mark As Read [added May 21, 2014 by Adrian; this extra step makes the difference between success & failure for some.]
Open Inbox >> Edit >> Check/select the top message; it will highlight the Move button.
Press and hold the move button and, keeping your finger on the Move button, use another finger to uncheck the message that you had checked earlier.
Lift all your fingers off the iDevice screen and leave it alone. Wait until all your messages pile up on the right-hand portion of the screen (in iPad); iPhone will give you the actual number of emails it has selected for the action.
Choose trash to delete all of them or any other folder where you want to move them. Remember this will replicate your action on the server so you will ACTUALLY move them or delete them on the server and not just the iDevice.
After moving all messages to the trash you can leave them there for the scheduled cleaning or empty them right away. To empty immediately go to the trash folder and touch Edit. The Delete All button shows up at the bottom of the screen. Hit it! You’re done!
If you do not see the effects of your actions on the server make sure you have enabled your email accounts for such actions.
Tips
Allow enough time (could take several minutes depending on the number of emails to be moved) for selecting the emails to move. Your screen may be unresponsive for a while. On an iPad, you will see them zoomed out on the right-hand side of the screen. On an iPhone you will see a message showing you the actual number of messages selected.
Avoid purging a very large number of emails, the mail app might freeze or crash. If your inbox has thousands of emails change your sync settings to store less emails in your inbox.
[Added Jul 20, 2014, by Adrian] Many people have reported needing to repeat the above procedure several times before it succeeds. (I too have found this to be necessary a few times on my iPhone but not on my iPad—go figure.) So my final tip is to repeat the procedure 3-4 times if the mail doesn’t disappear the first time. In my experience, if your messages disappear momentarily and then reappear, repeating the procedure will eventually make them stay deleted for good.
That’s how to delete ALL mail messages from iPhone/iPad in one step!
According to a widely ballyhooed study, event planning is the 6th most stressful job. I have no idea if that’s true, but, looking back on the two-day event I ran last week, I estimate that I had to solve well over a hundred on-the-spot problems that cropped up during the twenty-four hours I was on duty.
If you’re looking for a solution to a problem, there’s a natural temptation to pick the first solution you come up with.
In my experience, this is usually a mistake. An understandable mistake, for sure, but still a mistake. Most of the time, the first solution I come up with is not the best choice, so it’s worth taking a little more time to think before springing into action.
You can reduce the possibility of a poor decision caused by a hasty response by employing The Rule Of Three.
The Rule Of Three
Before deciding on a course of action, come up with three alternatives.
Here are three ways of thinking about The Rule Of Three.
1) Family therapist Virginia Satir encouraged people to have at least three choices. She said:
…to have one choice is no choice;
to have two choices is a dilemma;
and to have three choices offers new possibilities. –The Satir Model, Virginia Satir, et al
2) Jerry Weinberg (who came up with this rule’s name) puts it another way that should get your attention:
If you can’t think of three things that might go wrong with your plans, then there’s something wrong with your thinking.
3) One more formulation: If you don’t have three options for a solution to a problem, you don’t understand it well enough yet, and you might need to explore it more.
Applying The Rule Of Three
It can be hard to apply The Rule Of Three, especially in stressful situations. Sometimes I have a hard time resisting acting on the first idea that pops into my head.
Here are two ways that help me apply The Rule of Three:
1) Get help to come up with more options. When I’m under pressure, asking trusted colleagues to help brainstorm alternatives is a great way for me to widen my problem-solving horizons and avoid missing a great solution. Two (or more) heads are better than one.
2) As with making most changes in your life, practice helps. Commit to applying The Rule Of Three to problems you encounter for three days. Then evaluate the results. How and under what circumstances did The Rule Of Three work for you? Decide whether you want to continue the commitment to maintaining this new approach to problem-solving.
Uh oh, only two options here. I’m looking for at least one more. Suggestions?
Here’s a simple idea, courtesy of edACCESS colleague Bill Campbell, that can come in real handy when you want to live blog a public conference session without devoting most of your time to keeping up with what the speaker or participants are saying.
Crowdsource your event recording! How? Before the session, create a public Google Doc, shorten the weblink to the document, and publish the shortened URL on the Twitter feed for the event and/or on the projection screen in the room before the session starts, together with a request to help out with session notes. Anyone with the web link will be able to log in and help share the work of documenting the session.
Do you ever live blog a public conference session this way? Share your experience in the comments below!

 In a typical in-person conference breakout session, participants divide into small groups to discuss one or more topics. Each group records members’ thoughts and ideas on one or more sheets of flipchart paper. At the end of the discussions, groups post their papers on a wall and everyone walks around reading the different ideas. Facilitators call this a gallery walk. Here’s a tip to improve breakout gallery walks.


 After years of trying many tools, here are my two favorite free easy ways to create graphics for blog posts and presentations if you’re not a graphics wonk. (Note: I am not a graphics wonk.)
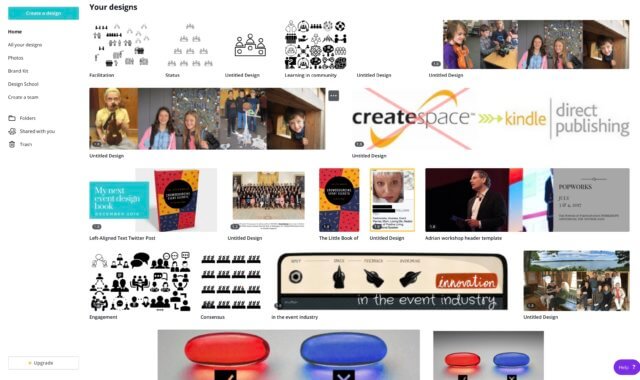


 When you need professional help, how do you hire the best professional help?
 Here’s how to delete ALL mail messages from iPhone/iPad in one step. Yes, there is a way to delete all your unwanted iPhone/iPad emails from the Mail app in one step! No more left-swipe: tap Trash for every individual message. No more Edit: tap the single open circle next to every individual message and finally tap Trash. And you don’t need to jailbreak your device.
