Tips on building a Corsi-Rosenthal Box for an airborne pandemic

A photograph of Adrian Segar's office, showing a set of parts needed to make a Corsi-Rosenthal box.

I just built a Corsi-Rosenthal Box. You might be thinking “What?” Well, it’s a simple and inexpensive DIY air filtering device that helps remove airborne viruses, wildfire pollution, pollen, dust, etc. from indoor air. Of particular note: the filters used are good enough to remove COVID-19 aerosols from contaminated air. Also, it’s incredibly easy to build and inexpensive. My Corsi-Rosenthal Box took less than an hour to make using the readily available supplies shown above. And it cost just $94 plus a dollar or two for duct tape.

That compares favorably with the $230 sleek Coway Air Purifier, shown below, that I purchased at the start of the COVID-19 pandemic. Especially since the latter is rated at ~250 cubic feet per minute (CFM) while mine provides ~350 CFM.

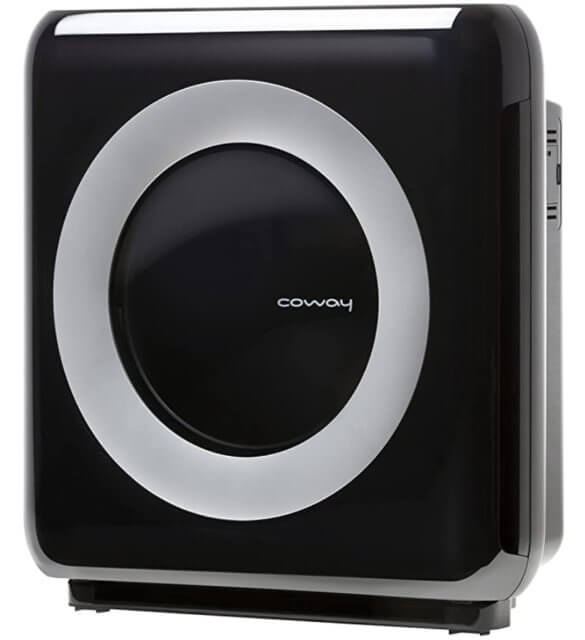
My air filter is 40% of the price of the Coway yet provides 40% more ventilation!

To be fair, mine is larger — and uglier. Here it is!

Even though I’d never made one before the air cleaner took less than an hour to put together. If I did it again, I think I could build one in less than 30 minutes.

Materials, tools, and basic construction

Corsi-Rosenthal box materials
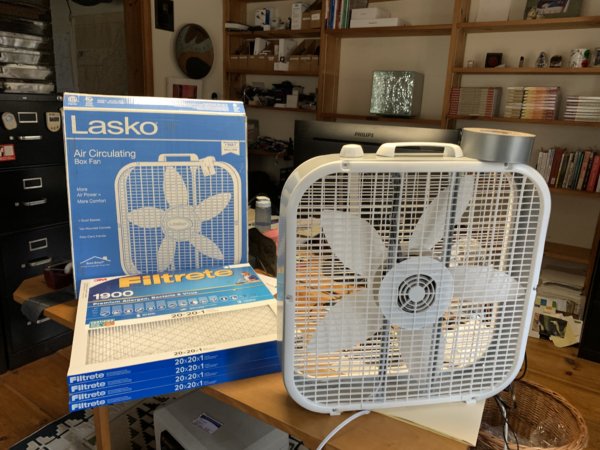
All the materials I used are shown above. Here’s the list:

The only tools I needed were a Swiss army knife, scissors, a pencil, and a loop of string. (Oh, and a thumbtack.)

Because there are already good resources available for choosing components and building a Corsi-Rosenthal Box, I’m not going to replicate them here. Instead, here’s what I found most helpful:

These resources cover everything you need to know to build inexpensive and effective air cleaners, plus a little interesting history of how they came to be.

Tips on building a Corsi-Rosenthal Box

While building my box I learned some little details that aren’t covered in the core resources above. None of them are vital, but they might help you. Here they are:

Making the box as square as possible

Corsi-Rosenthal box taped filters

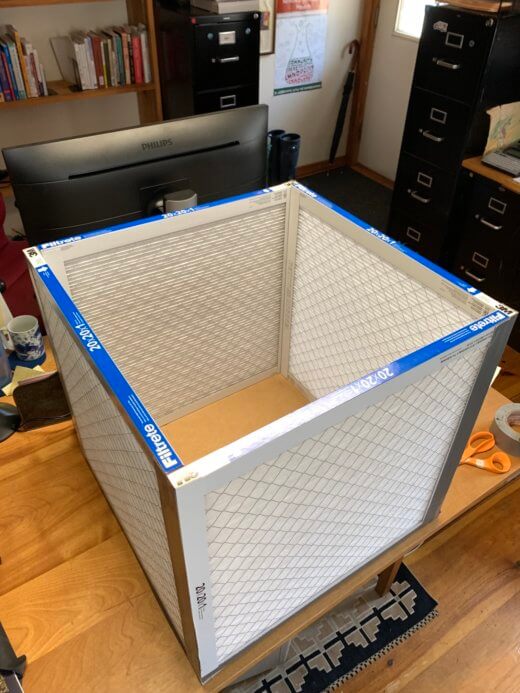
How should the four filters be duct-taped together? See the picture above, which shows the seam arrangement I used to create a square shape. I found that 2″ duct tape worked well for the entire project.

You probably don’t need extra cardboard!

I purchased my fan and filters online, and both got shipped in boxes that are the perfect size to provide the cardboard you need. I used the Lasco fan box for the box base (see below), as well as four pieces needed to seal the corners of the fan mounting and the fan shroud (see next two sections). Very little cardboard was left!

Corsi-Rosenthal box bottom cardboard

Note that I sealed the bottom of the box along the filter edges and added four additional short strips of duct tape at each corner to reinforce the construction.

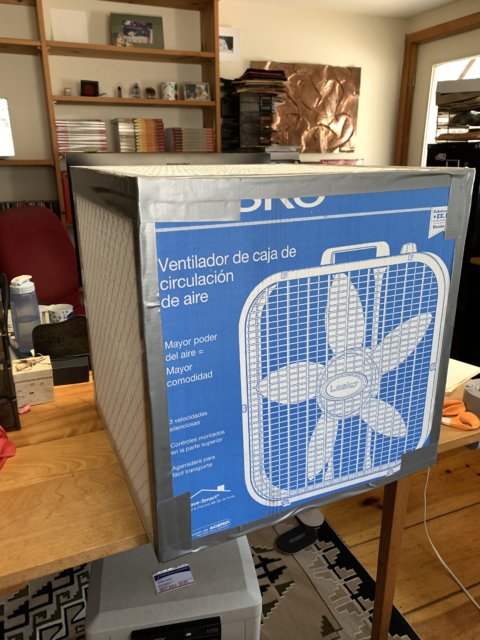
Creating four cardboard corner arcs to seal the fan mounting and the fan shroud

Here’s how I marked up the other side of the Lasco fan box to create four corner arcs that sealed the fan mounting and the fan shroud (see next section).

I placed the fan in the center of the cardboard and drew around its edge, creating the outside pencil line as shown below.

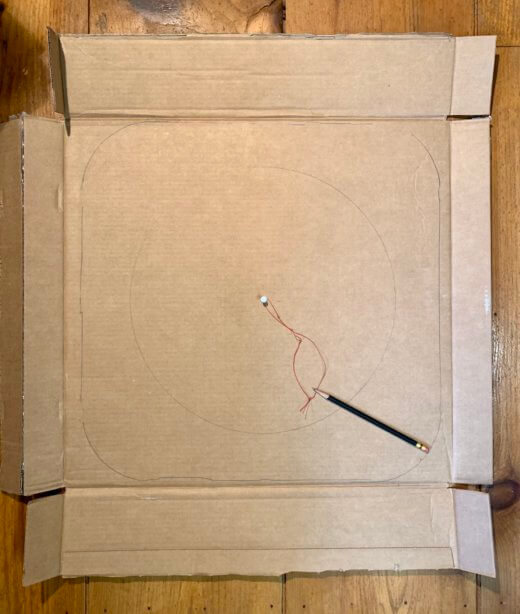
After removing the fan, I used a tape measure to find the center of the cardboard and inserted a thumbtack. Then I made a loop of string to draw a circle to cut out for the air exhaust portion of the fan shroud. (Look at the earlier photo of my finished unit to see what the fan shroud looks like.) The right length for the loop will depend on the fan you use. Here are the optimum fan shroud openings (with the 3M Filtrete 1900 filters I used) for two common fans:

So for my Lasco fan, I used a 15″ loop of string to draw a central circle with a 7.5″ radius.

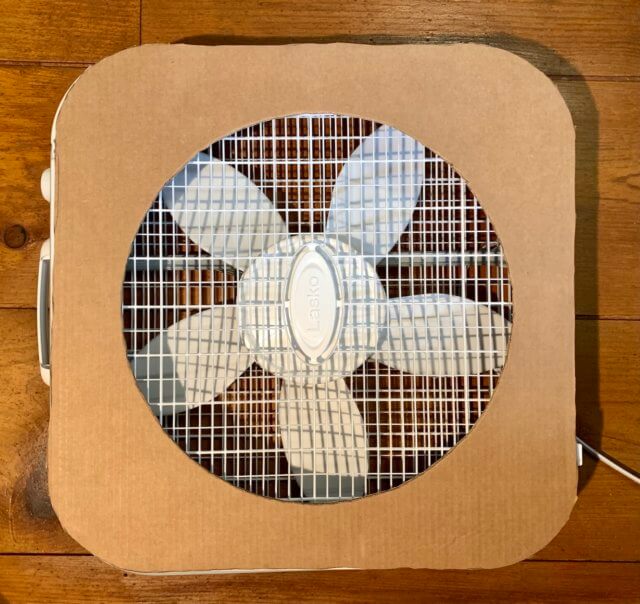
After marking the cardboard I cut the four fan seal corner arcs from the cardboard corners with my Swiss Army knife and duct-taped them in position as shown below.

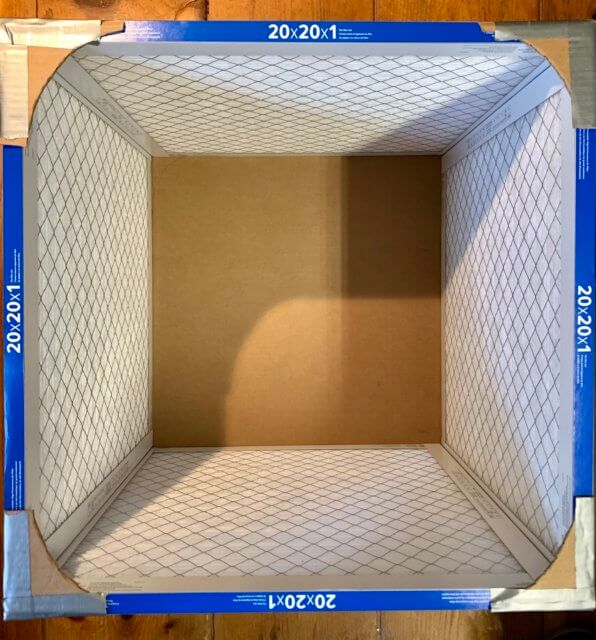
I then cut out the fan shroud.

Final assembly

All that remains at this point is to place the fan on the top of the box and seal it to the filter edges and the corner cardboard arcs with duct tape. Finally, tape the edges of the fan shroud to the fan.

You’re done! Here, again, is the finished unit.

This Corsi-Rosenthal Box is quiet, even on maximum fan speed, and noticeably more powerful than my commercial Coway unit. I live in a very airtight home — my CO₂ meter shows significantly higher readings when just the two of us are there. So I am happy to have this second unit available when folks visit. Building it was fun and easy. Recommended!


How to support a community online

Adrian Segar facilitating a small Zoom meeting to support a community onlineHow can you support a community online? Over the last few weeks, I’ve run numerous online Zoom meetings for support groups and local, social, and professional communities. In the process, I’ve learned a lot about what makes these meetings most useful for participants.

I’m sharing what I’ve learned (so far) here.

Key takeaways

• Breakout room functionality is essential for your online meeting platform.
Small group conversations are the core components of successful online meetings. (If your meeting only involves people broadcasting information, replace it with email!) Unless you have six or fewer people in your meeting, you need to be able to efficiently split participants into smaller groups when needed — typically every 5 – 10 minutes — for effective conversations to occur. That’s what online breakout rooms are for. Use them!

• It’s important to define group agreements about participant behavior at the start.
For well over a decade, I have been asking participants to agree to six agreements at the start of meetings. Such agreements can be quickly explained, and significantly improve intimacy and safety. They are easily adapted to online meetings. (For example, I cover when and how the freedom to ask questions can be used when the entire group is together online.)

• Use a process that allows everyone time to share.
You’ve probably attended a large group “discussion” with poor or non-existent facilitation, and noticed that a few people monopolize most of the resulting “conversation”. Before people divide into small breakout groups, state the issue or question they’ll be discussing, ask someone to volunteer as a timekeeper, and prescribe an appropriate duration for each participant’s sharing.

• People want and need to share how they’re feeling up front.
I’ve found that pretty much everything important that happens at these meetings springs from people safely sharing at the start how they feel. They learn that they’re not alone. I ask participants to come up with one to three feeling words that describe how they’re feeling: either right now, or generally, or about their personal or professional situation. They write these words large with a fine-point permanent marker on one or more pieces of paper and share them, one person at a time, on camera or verbally. (Elaborations come later.)

• Sharing what’s working is validating, interesting, and useful.
In my experience, most people have made some changes in their personal and/or professional lives. Sharing these in small groups is a supportive process that’s well worth doing.

• Consultations are a powerful small group activity.
Set aside time, if available, for a few group consults on individual challenges. Ask for volunteers. They will receive support, and their small group of impromptu consultants will feel good about helping.

• Don’t forget to provide movement breaks.
Occasional movement breaks are even more important for online than face-to-face meetings. Participants can feel trapped sitting in front of their cameras. Schedule a break every 45 minutes.

• Check before moving on to a new topic.
If you are on video, ask for an affirmative sign (thumbs up or down), or use Roman voting. On audio, ask “Who has more to contribute to this?”

• Provide a set of tips and conventions for the online platform you’re using.
Here are mine for Zoom.

• Schedule time for feedback and/or a retrospective.
Key questions: What was this like? Do we want to do this again? If so, when, and how can we improve it?

Preparing for your community online meeting

Key information should be distributed appropriately well in advance of the meeting. Include it in a single online document, and create a descriptive URL shortened link (e.g. bit.ly/ephhfeelings).  I suggest you share a short promo for your why? for the meeting, followed by this “complete details” link. Because many people don’t read the details until shortly before the meeting, resend your share closer to the time of the event.

I also like to display the link printed on a card visible in my video feed, so folks who have joined the meeting can catch up. Don’t rely on a chat window for this, since latecomers will not see earlier chat comments in most meeting platforms.

Here’s a sample of what you might want to include in your pre-meeting document for a 90-minute online meeting. My comments are in curly brackets {}.


Sample pre-meeting information document for community online meeting

[Date and start/end time of meeting]
[Time when the host will open online meeting] {I suggest opening the meeting platform at least 15 minutes before the meeting starts. This allows people, especially first-time users, time to get online}
The meeting starts promptly at [start time]

Please check out the following three links before the meeting:

Why you should attend [meeting title] {audience, rationale, agenda, etc.}
How to join this meeting {complete instructions on how to go online}
[Meeting platform] tips {make it easy for novices to participate — here are my Zoom tips}

Preparation

Please have a few blank pieces of paper and a dark color fine point permanent marker (several, if you are artistically inclined). Before we start, write large on one piece of paper where you’re calling from. On another, please write (or illustrate) one to three feeling words that describe how you’re feeling: either right now, generally, about your personal or professional situation — you choose.

Schedule

We will open the meeting at 11:45 am EDT.

Please join us before 12:00 if at all possible, so we can start together promptly. We’ll try to bring you up to speed if you join late, but it may be difficult if there are many already online and it will be disruptive for them.

The exact timings will depend on how many of us are present. This plan may change according to expressed needs. All times EDT.

11:45: Online meeting opens.

11:45 – 12:00: Join the meeting.

12:00: Meeting starts. Housekeeping. Where are you from?

12:05: Sharing our feelings words together.

12:10: Preparing for sharing what’s going on for you.

12:15: Sharing what’s going on for you in an online breakout room.

12:25: Group recap of commonalities and illustrative stories.

12:35: Preparing for sharing what’s helped.

12:40: Sharing what’s helped in the online breakout room.

12:50: Break — get up and move around! {Share your screen with a countdown timer displayed so people know when to return.}

12:55: Group recap of what’s helped.

13:05 Preparing for individual consulting. {Ask for a few volunteers.}

13:10: Individual consulting in an online breakout room.

13:25: Group recap of individual lessons learned.

13:35: Group feedback on the session. Do we want to do this again? If so, when, and how can we improve it?

13:55: Thanks and closing.

14:00: Online meeting ends.


Support your community online

Most online meetings do a poor job of maintaining participants’ attention. I’ve found that starting with a quick opportunity for people to share how they’re feeling effectively captures attendees’ interest. And using a platform and process that allows everyone time to share what’s important keeps participants engaged. You might get feedback like this…

“I just wanted to reach out again and thank you for the call today. What an incredible conversation spanning such significant geographical areas. The perspective we gain from discussion like today is priceless. I just got off of another call with [another community] and the vibe was completely different. While everyone was respectful, everyone’s overall sense of well being was generally pretty positive. And that’s where they wanted to keep it.”
—A participant’s message to me after an online meeting last week

Please try out these ideas! And share your suggestions and thoughts in the comments below.

The two must-do steps to hire the best professional help

hire best professional help: photograph of a man trying to access an ATM that has been installed too high off the groundWhen you need professional help, how do you hire the best professional help?

Countless experts — accountants, plumbers, doctors, lawyers, and meeting planners — will take your money in exchange for advice or services. So, when it’s time to minimize your taxes, modernize the bathroom, diagnose that stabbing stomach pain, draft a complex contract, or organize multiple regional conferences — in short, get help with something you can’t do yourself — how do you choose great help?

It isn’t easy. If it was, we wouldn’t hear horror stories about accountants who can’t file a correct tax return, builders who make costly (and hilarious) mistakes, serious cases of medical malpractice, million-dollar errors made by attorneys, and mistakes that meeting planners continue to make.

Why it’s hard to hire the best professional help

You need a new kitchen sink. How can you determine whether someone who says they’re a plumber really knows what they’re doing?

There’s a simple reason why it’s tricky to pick great professionals. If you need help, obviously you lack crucial knowledge or experience. So when you seek help, you don’t know if someone who claims to be able to help really can!

Don’t despair! Here are the two essential steps to take to hire the best professional help.

Ask for and check references

Everyone knows that you should ask for references for a professional who’s going to do work for you. Unfortunately, knowing you should do something doesn’t mean you will actually do it. How often do you ask for references from a professional you’re planning to hire? Do you ask a potential builder? An accountant? A doctor? In my experience, I am rarely asked for references.

In addition, many people ask for references but don’t check them! You may think professionals will only give you the names of people who are satisfied with their services. While that’s usually true, talking to references will invariably turn up useful information. For example, you may discover that a plumber does good work but doesn’t finish in a timely fashion. Or an attorney writes competent contracts but his drafts need to be carefully checked to make sure that changes you request are actually incorporated. It’s common to hear information from a reference that immediately makes you decide not to employ the professional.

So getting and checking references before hiring is an essential step if you want to minimize unpleasant surprises. These days, crowd-vetted online sites like Angie’s List and houzz provide a helpful starting place, but you can’t beat talking directly to clients of professionals you’re considering.

See if they’ll say, “I don’t know”

My mother had an unusual set of medical symptoms. Unfortunately, she picked a doctor who was unable to admit that he didn’t know what was wrong with her. Instead, he told her that she had multiple sclerosis, which caused her much emotional upset. Years went by without the relapses or progressions normal to her illness. But she refused to believe that his diagnosis was wrong. Finally, I called him up and confronted him, and he admitted that she did not have the disease. Years of suffering could have been avoided if we had ascertained at the outset that he was incapable of admitting that he didn’t have all the answers.

Checking to see if a professional will say they don’t know when they actually don’t is an important hiring step that is rarely performed. Interview the professional and ask them questions about the work you want them to do. Listen carefully to how they respond to your questions. You are looking for them to show that they know the limits of their abilities and that they are willing to share their limits with you.

If necessary, ask whether they can do something that is a little outside their stated expertise and listen carefully to how they respond. If you hear an unwillingness to admit that they are not able to fulfill your request, you are receiving an important warning. Ignore it at your peril!

Choosing professionals who are aware of and clear and honest about their own limits ensures not only that they can actually do the work you need, but also that they will let you know when they are unequipped to handle any problems. These are the people you want to work for you.

One more thing

Know your own limitations, and make sure you ask for help when you can’t solve a problem by yourself!

That’s it!

Faithfully execute these two simple steps when choosing professionals and you’ll avoid the common problems that occur when obtaining help with life’s challenges. These must-do steps have made it possible for me to hire the best professional help for years. I hope they help you too.