Well, listen to and consider this June 11, 2021 quote from former candidate and now New York City Mayor Eric Adams:
“With new technology of remote learning, you don’t need school children to be in a school building with a number of teachers. It’s just the opposite. You could have one great teacher that’s in one of our specialized high schools teach 300-400 students…”
When the Mayor of New York City has this take on how people learn, perhaps it’s not so surprising that we’re still sitting through endless broadcast-style sessions at meetings and conferences.
Until we elect leadership that has a basic understanding of how great teachers actually teach, and how their students can effectively learn, we’re going to continue to live in a world of meetings full of ineffective lectures.
If people come to meetings to learn, how can we create the best environment for them to do so? It turns out that trust and safety are prerequisites for optimum learning at meetings. Let’s explore why.
Unfortunately, traditional conferences are poor places for this kind of learning to occur, since they’re filled with broadcast-style lectures, during which no interpersonal interaction takes place.
At well-designed meetings, however, participants have plenty of opportunities to engage with peers about topics that are personally important. The key learning modality at such meetings is peer learning.
Peer learning allows anyone to be a teacher and/or a student, with these roles switching from moment to moment. Potentially, everyone has something to contribute and learn. Peer conferences first uncover the content and issues people want to discuss. They then facilitate appropriate peer learning around topics of interest. My books and this blog provide plenty of information on how to do this.
Of course, in order for peer learning to occur, participants need to share what they know.
And this is where trust and safety issues impact learning.
“It is important to stress that we are all connected through a complicated net of trust. It is not as if there is a group of people, the non-experts, who have to trust the experts and the experts do not have to trust anyone. Everyone needs to trust others since human knowledge is a joint effort…It is well known that low levels of trust in a society leads to corruption and conflict, but it is easy to forget the very central role that trust plays for knowledge. And knowledge, of course, is essential to the democratic society.” —Åsa Wikforss, Why do we resist knowledge?
Why people may not share their knowledge
Knowledge management author Stan Garfield shares sixteen reasons why people don’t share their knowledge. Here’s a key one:
“They don’t trust others. They are worried that sharing their knowledge will allow other people to be rewarded without giving credit or something in return, or result in the misuse of that knowledge.” —Stan Garfield, 16 reasons why people don’t share their knowledge
So, when trust is absent, knowledge fails to flow. But when knowledge flow is stemmed, opportunities for trust are reduced. This is a positive feedback loop that guarantees low trust and knowledge sharing.
This breakdown of trust can happen anywhere. Between individuals, in organizations, and at a societal level. And it is easy for it to happen at meetings.
Designing for trust, safety, and learning
In general, the more meeting attendees trust each other, the safer they feel. The safer they feel, the more likely they are to share their knowledge.
So when I design and facilitate meetings, one of my most important goals is to provide a maximally safe environment for sharing. This maximizes the potential for consequential learning.
That’s why I:
introduce group agreements upfront, one of which has participants keep what individuals share confidential;
create an environment where it’s OK to make mistakes (or where mistakes are impossible);
provide ample opportunities for group discussions, rather than lectures, around appropriate content; and
give people the right to not participate at any time.
The last condition is important. An attendee’s level of trust and feeling of safety may vary from moment to moment during a meeting. Giving attendees the freedom (and responsibility) to decide not to participate and/or share at any time allows them to determine and control what is personally safe to do.
Gamification “makes about as much sense as chocolate-dipped broccoli”. Education professor Amy Bruckman coined this analogy in a 1999 paper on game software design:
“Most attempts at making software both educational and fun end up being neither. Fun is often treated like a sugar coating to be added to an educational core. Which makes about as much sense as chocolate-dipped broccoli. The problem is that too many game designers are using long-outmoded models of what it means to be “educational”.
Game designer and author Ian Bogost makes the same point somewhat more forcefully:
“…gamification is marketing bullshit, invented by consultants as a means to capture the wild, coveted beast that is video games and to domesticate it for use in the grey, hopeless wasteland of big business, where bullshit already reigns anyway.
Bullshitters are many things, but they are not stupid. The rhetorical power of the word “gamification” is enormous, and it does precisely what the bullshitters want: it takes games—a mysterious, magical, powerful medium that has captured the attention of millions of people—and it makes them accessible in the context of contemporary business.” —Ian Bogost, Gamification is Bullshit (2011)
So what is gamification?
Merriam-Webster defines gamification as “the process of adding games or gamelike elements to something (such as a task) so as to encourage participation.” Nick Pelling, a British computer programmer and inventor, apparently coined the word around 2002.
The concept derives from loyalty reward systems, first developed over two hundred years ago, which have morphed through multiple incarnations (anyone remember S&H Green Stamps?) into today’s frequent flier miles and retailer brand loyalty cards.
So gamification adds the potential reward of interaction with others to the material rewards offered by loyalty reward systems.
Proponents of using gamification in events claim that introducing fun and games into meetings must be a Good Thing. What could be wrong with making your meeting more fun?
Bernie DeKoven on gamification
So, here’s what Bernie said in a 2013 interview in Wired (emphasis added):
“I’m not convinced that efforts to make work fun are destined for success. I think the same thing about efforts to make learning fun, or writing fun, or just about anything else that we want to make fun fun.
Because, now that you ask, most human endeavors are already fun. Because the thing that keeps the best of us as good as we are is the fun we find in doing what we do, whether the thing we are doing is building a house or a game or a community, making plans or music or medicines, fixing the plumbing or a computer network or a school system, writing poems or proposals. Engineers, mathematicians, surgeons, dancers, architects, so many of the truly accomplished many readily confess to how much fun they are having doing whatever it is that they do. Gamification? They don’t need no stinkin’ gamification. They don’t need to keep score, to get trophies. What they need is the opportunity to do the work they do best.” —Bernie DeKoven: Designing Deep Fun Into Games & Other Life Necessities
I agree with Bernie. Many companies offer gamification products and services to slot into an event. (Googling “event gamification” returns about five million hits.) Supposedly, the achievements, badges, leader boards, and payments (real or virtual) of gamification improve the meeting experience, or its effectiveness in some way. But the case studies companies provide (such as these or these) offer no hard evidence that event gamification provides any tangible benefit compared to using meeting designs that meet participants’ wants and needs.
Event gamification — chocolate-dipped broccoli
Justifying paying (it ain’t free) for gamification at a meeting by claiming it links fun and relevant learning is bogus. I’m all for participants having fun, but meeting professionals already know how to create fun experiences at events — we’ve been doing this for a long, long, time.
So don’t buy the claims of gamification vendors. Instead, assign chocolate-dipped broccoli to its proper function…an April Fool’s post.
Are five million Google links wrong? Do you think that event gamification is not chocolate-dipped broccoli? Your thoughts are welcome in the comments below!
Unlearning is crucial for change, both personal and organizational. Here are two examples of unlearning from the Apple ecosystem: one successful, and one not.
#1 The Apple Watch Workouts app
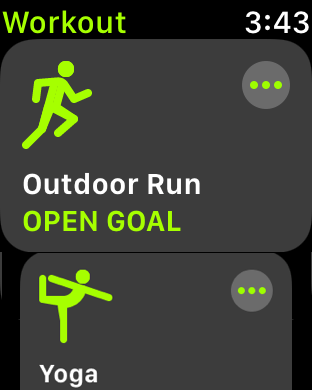
In 2017, I purchased an Apple Watch. It has improved my life in many ways. In particular, it’s become an essential tool for supporting my desire to exercise daily. The watch’s Workout app tracks my exercise. All I need to do is to tell it what kind of exercise I’m about to start and leave the app running until the exercise is over.
To pick the right exercise, the watch shows a scrollable list. Here’s what I saw today when I tapped the app:
Right now I’m living at home, and the two workouts I do most often are my daily outdoor run and yoga. So it’s convenient that these options are the first two I see.
The Workout app learns my preferences and adjusts its display to show me the most likely workouts first.
My environment changes
Almost every year, I vacation in Anguilla, typically for three weeks. My exercise program there is different. I don’t run (it’s too hot for me!) but I walk daily, followed by a pool swim.
After a few days, the Workout app unlearns my most common home-based exercises and relearns my new routine, replacing the top two items on the Workouts list with the Outdoor Walk and Pool Swim choices.
For the remainder of my vacation, these two options stay at the top of the list.
Alas, all good things come to an end. On returning home, the Workout app unlearns my Anguilla routine and relearns my home routine.
And if my exercise regime changes over time, due to circumstances or location, the Workout app will continue to use its learn-unlearn-relearn routine to display the most likely choices first.
I’m sure that Apple has incorporated other examples of unlearning into its products, but this is one I’ve noticed. Small thoughtful touches like this have helped Apple products and services become market leaders in a very competitive industry.
#2 Apple Mail
Apple doesn’t always get things right, unfortunately. Apple’s Mail program provides a classic example of what happens when unlearning is not an option.
Apple Mail allows you to file messages in folders, a useful way for me to organize the 94,000 emails I currently store. Trying to be helpful, the program learns where you tend to store specific kinds of messages, and after a while, right-clicking a message will pop up an option to move it to the “learned” preferred folder.
This is a generally helpful feature — except…
Once Apple Mail has “learned” where to file an email, it won’t unlearn that choice!
Furthermore, there’s no way to manually reset Apple Mail’s choice!
For example, let’s say you’ve been working with Marce, a client’s employee, for some time, so you’ve been moving Marce’s emails to a folder for that client. After a while, Apple Mail helpfully offers to move emails from Marce to that client folder. So far, so good. Then Marce moves to a new company, and you continue to work with them. Now you’d like to file Marce’s emails in a separate folder for the new client. Unfortunately, no matter how many times you manually file Marce’s emails in the new client’s folder, Apple Mail will forever continue to suggest moving them to the former employer folder!
You will have to move email from Marce to the new employee folder manually every time, remembering every time not to choose the (wrong) default Apple Mail continues to suggest.
This is a drag and a product flaw.
It surprises me that the Watch software incorporates learn-unlearn-relearn into its memory-limited program space, but Apple Mail on the desktop, where program size is not an issue, only includes the learn piece.
Organizational unlearning
I’ll conclude with a few observations about the wider value of unlearning in organizations.
Most organizations need to innovate constantly, due to changing circumstances. Innovation doesn’t just involve coming up with new ideas. Innovation also requires a willingness and ability to cannibalize or destroy existing products or services; i.e. to unlearn what used to work and relearn what is now relevant.
Is most classroom practice astrology? David Bowles thinks so.
I’ll let you in on a secret. I have a doctorate in education, but the field’s basically just a 100 years old. We don’t really know what we’re doing. Our scholarly understanding of how learning happens is like astronomy 2000 years ago.
Certainly, the vast majority of my education consisted of the learn-from-lectures education model that still largely dominates schools and conferences. Was that true for you too?
We can’t even agree on what kind of astrology to use
In addition, society’s three fundamental desires for children’s education drive our primitive ideas about classroom practice. As laid out in Kieran Egan’s thought-provoking book, The Educated Mind, these desires are:
making good citizens;
mastering certain bodies of knowledge; and
fulfilling each student’s unique potential.
Politicians, researchers in education, teachers, and citizens continue to argue about the relative importance of these noble goals. Unfortunately, Egan shows that you can’t satisfy all these ideals simultaneously because they’re mutually incompatible!
What we do know about effective meeting and classroom learning
Lectures are a terrible way to learn. Knowledge is not a “thing” one person transfers to another. Rather, knowledge is a relationship between the knower and the known; knowledge is “created” through this relationship.
We learn predominantly socially, not alone in our minds. Rather, we learn in social contexts, through mind, body, and emotions.
Learners create knowledge; they don’t receive knowledge.
We learn best by actively doing and managing our own learning.Not by listening and watching.
In other words, learning is a process, not a transaction. Research shows that the vast majority of our important learning occurs via self-directed activities and while interacting with others.
Astronomy, not astrology
At the end of the 19th century, astrology, a pseudoscience in vogue for over two millennia, was finally replaced by the science of astronomy. The meeting industry, as we know it today, began about 350 years ago. The research about how we learn most effectively is decades old and still hasn’t widely infused into classroom and meeting practice.
Astronomy finally replaced astrology as the predominant way to look at our world. We need to replace the astrology of current meeting and classroom practice with the astronomy of effective learning.
Are you old yet? (Click on the image to watch the skateboarding professor, who’s my age.)
I turned 69 last week. My body and mind do not work as well as they used to. Oh for the days, long gone, when I went to bed, fell asleep immediately, and woke up eight hours later feeling refreshed! My stamina starts to drop at five pm; no more long productive bouts of late night work.
Traveling extensively for my meeting industry work, I’d meet hundreds of new people every year, and used to be pretty good at remembering their names and how and when I met them. Not these days.
There are all these little aches and pains that weren’t there before. Standing up from a chair is harder than it was. Standing after kneeling on the floor is unexpectedly difficult at times.
It’s not going to get better. (Although, I can run better than I did twenty years ago. But I really had to work at that.)
Anyway, I could go on. This is a litany you’ll likely experience at some point in your life. If you haven’t already.
So, I ask myself: “Are you old yet?”
And then, today, I read this quote from Nobel Prize winner Rosalyn Yalow.
“The excitement of learning separates youth from old age. As long as you’re learning, you’re not old.”
—Rosalyn Yalow
You know what? I’m still learning and unlearning every day — and I’m excited about it!
Part 1 of this series of posts gave an overview of what’s involved in implementing participant-driven breakouts in Zoom, and Part 2 explained how to prepare for The Three Questions.Part 3 describes how to run them using Zoom breakout rooms, and Part 4 covers how to create an optimum conference program. Read them before diving into this post! This post, Part 5, the last in this series, explains how to run your peer conference using Zoom breakout rooms.
Overview
Once you have developed and distributed your conference program, as described in Parts 1 – 4 of this series, it’s time to run it!
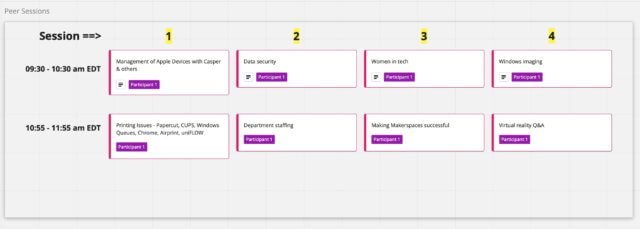
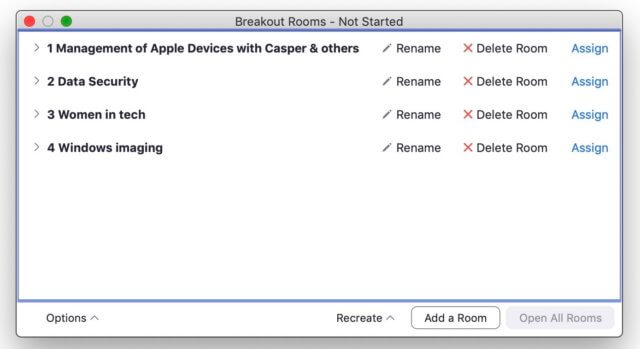
You’ll use the same procedure for every conference time slot. First, create breakout rooms for the peer sessions scheduled in the time slot, and then name each room with a number and session topic.
Currently, Zoom has no easy mechanism for participants to move from one session to another. So it’s best to share the conference program with participants in advance, and, for each time slot, ask them to pick the session they want to attend. I’ll describe the simplest (and most common) way to do this below.
Right before each session time slot, participants are assigned to the Zoom breakout room associated with their chosen session. Once this is done, the breakout rooms are opened and the sessions commence.
At the end of each session, participants return to the main Zoom meeting and indicate their choice for the next set of sessions. After renaming breakout rooms with the next set of session topics, the cycle repeats.
Moving between breakout rooms
At in-person conferences, participants are normally free to leave a breakout session and move to another one.
At an online conference using the Zoom platform, once participants are in a specific breakout room/session, they can only leave the room and return to the main Zoom meeting. They cannot move themselves to another breakout room unless they have been given co-host status in Zoom.
[UPDATE. Since September 2020, Zoom allows participants to move themselves to another breakout room. Nevertheless, I still strongly recommend having a staff member stationed in the main Zoom room (see below), as some participants may not know how to change their breakout room or have some other concerns that this staff member can address.]
Although one could give all participants co-host status so they could move themselves to different sessions, I don’t recommend it. Co-hosts have a lot of power in a Zoom meeting, and one malicious or careless participant could really mess up your meeting.
One big advantage of peer conferences is that opening with The Three Questions leads to conference programs that are much more likely to reflect participants’ genuine wants and needs. As a result, moving between simultaneous breakouts is relatively rare at in-person events.
Nevertheless, people will occasionally want to move to a different session during a time slot. (The most common reason, in my experience, is that they chose or were assigned to the wrong breakout room by mistake.) As a result, while you’re running sets of peer sessions, you’ll need to keep a staff member stationed in the main Zoom room. This person should have co-host status, so they can reassign participants who return to the main meeting from a breakout room and ask to join a different session.
Preparing participants to choose their desired session
Before each set of sessions begins, one of your staff (a Zoom host or co-host) creates a set of breakout rooms that match the peer sessions about to be held. Since you’re going to assign participants to specific rooms, pick the Manual option when creating the rooms.
While creating breakout rooms, provide participants with a numbered list of the breakout sessions for the time slot (see below). If you’re using Miro, add session room numbers and export or screenshot the relevant portion of the conference program.
To keep everyone in Zoom, I suggest having a host or co-host display the list, using screen sharing in the main Zoom meeting.
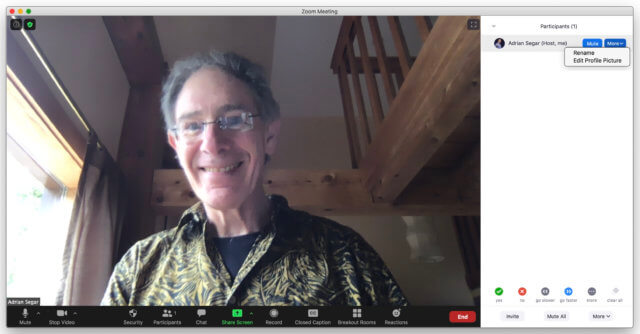
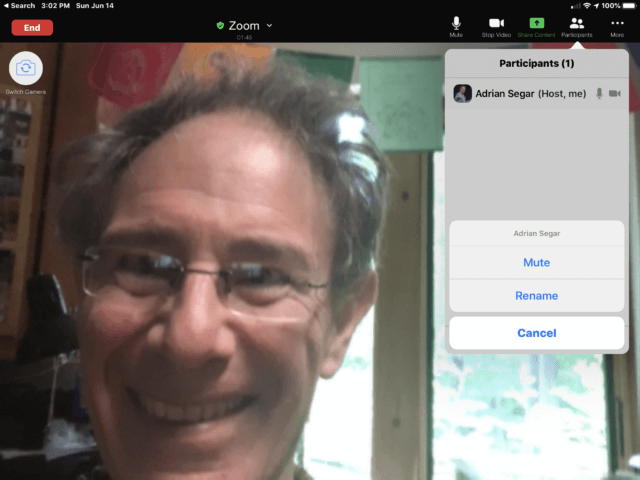
Now it’s time for participants to pick the peer session they want to attend. While they’re all present, display the current session choices and explain that to assign them to the correct session they’ll edit their display name to add the breakout room number in front of their name. Give them an example: e.g., “If I want to attend the Data Security session next, I need to change my name from Adrian Segar to 2 Adrian Segar.”
This is a common technique these days, and many people who are familiar with Zoom know how to change their Zoom meeting name while in the meeting. However, since some participants won’t know how to do this, provide instructions like these:
How to change your screen name on a PC during a Zoom meeting
1: Click on Participants in the Zoom toolbar at the bottom of your screen.
2: Hover the mouse pointer above your name until you see the option to select More.
3: Once you see it, click on it and select Rename.
4: Enter your desired name in the text field and click Rename to confirm your selection.
How to change your screen name on a mobile device during a Zoom meeting
1: If the toolbar isn’t visible, tap on the screen to display it. Tap Participants to bring up the list of meeting participants.
2: Find your name on the list and tap on it.
3: Tap Rename, enter your desired new name, and tap Done.
Have participants choose their peer session breakout rooms
Once participants understand how to change their Zoom name to indicate the breakout session they want, have a staff member monitor the name changes on the Zoom Participants list, and assign them to the correct room. Make sure that session leaders are present and assigned to the correct room before proceeding. Sometimes there are a few people who don’t add their room number to their name. Have another staffer contact them by text chat or directly in the Zoom meeting, to check whether they need help. If there’s anyone who can’t figure out how to change their name, ask them which session they want to join. Pass the participant’s name and desired session to the breakout room assigner.
Explain to participants that if they wish to leave the session they’re in, they should click Leave Room. This will bring them back to the main room meeting, where a staffer can move them into another peer session.
Start a set of peer sessions
Before opening the Zoom breakout rooms, check the Breakout Room Options, which should look like this. (You can change the countdown timer setting if desired.)
You’re ready to start the set of peer sessions! Tell participants they are about to be moved to their desired session and click Open All Rooms.
Ending a set of peer sessions
Five or ten minutes before the sessions are scheduled to end, let everyone know how much time is left in the session. Do this by clicking Breakout Rooms in the Zoom toolbar. Then click Broadcast a message to all, enter your message, and click Broadcast.
A minute before the sessions are over, click Breakout Rooms and then click Close All Rooms. In a minute or less, everyone will be back in the main Zoom meeting.
Do it again!
Repeat the above process for each set of peer sessions until all sessions have been run.
To create a fresh set of breakout rooms, click Recreate and then Recreate All Rooms in the Breakout Rooms window.
That’s how you run your peer conference using Zoom!
shown how to run your peer conference using Zoom breakout rooms (this post).
A final point. As you know, peer conferences use the conference arc design, which includes a closing process that’s tailored to the wants and needs of the meeting stakeholders (here’s an example). I haven’t covered this important conference phase in this series, but you should spend time thinking about and designing appropriate closings for your online event. Perhaps I’ll write more about what this might look like, and how it can be implemented online in a future post.
If you’ve been planning to implement participant-driven breakouts in Zoom, I hope this series has been helpful. As always, I welcome your thoughts, questions, and suggestions in the comments below.
Part 1 of this series of posts gave an overview of what’s involved in implementing participant-driven breakouts in Zoom. Part 2 explains how to prepare for The Three Questions, and Part 3 explains how to run them using Zoom breakout rooms. Please read them before diving into this post! In this post (Part 4) I’ll cover Step #2 — how to process the participant information uncovered in Step #1 to create an optimum conference program. Part 5, the last in this series explains how to run your peer conference using Zoom breakout rooms.
Creating and convening your conference program group
By the end of The Three Questions (see Part 3), your scribed Google document contains a rich list of your participants’ desired and needed topics, issues, and current challenges. Now it’s time for a small conference program group of conference leaders and subject matter experts to use participants’ answers to the Second Question to create an optimum conference program. (Part 1 lays out options for your participants while this is going on.)
Make sure your small group contains someone from each Three Questions breakout group. These people can identify participants in their group who have the expertise, experience, or interest in leading or facilitating the sessions you choose.
The conference program group can meet in a variety of ways. Perhaps participants are listening to a presentation while your small group meets in a Zoom breakout room. If attendees are taking a meal break, you can use the current Zoom meeting, and restrict attendance to the conference program group. Or you can simply set up a separate Zoom meeting for the small group to hash out the upcoming conference program.
Building your optimum conference program
The small conference program group needs a tool to review and organize the topics that participants have requested and suggested.
Tools for in-person meetings
At in-person meetings, I use the process Post It! for Programs, described in Chapter 22 of my book Event Crowdsourcing. Read Chapter 22 to understand the detailed process I summarize in this post. (You may find Chapter 21, Peer Session Selection and Sign-up useful too.)
The small group starts with a wall of participants’ topics, written on large sticky notes. We clean up, cluster, and consolidate the topics, moving notes around and rewriting them as needed. The small group reviews and rates the results, and chooses the most relevant topics. Finally, we find leaders and/or facilitators for these peer sessions and schedule them into an optimum conference program.
Tools for online meetings
Two tools that provide the above functions for online meetings are Miro and Mural. You can read a useful comparison of their features and user interface here. Miro has a free limited version, and Mural offers a free limited-time introductory plan. It’s worth upgrading to a paid plan for either of these products if you expect to use them regularly.
In this post, I’ll outline how to use Miro to collaborate remotely with your small group. I don’t know Mural as well, but you should be able to use it in a similar fashion. Even though the basic concepts can be quickly grasped, both Miro and Mural provide a rich variety of functionality. So you and your small group members should practice using them. Before the conference, give small group members a link to a “playground” Miro board where they can freely explore Miro’s frames, sticky notes, and tools.
Importing participant topics into Miro
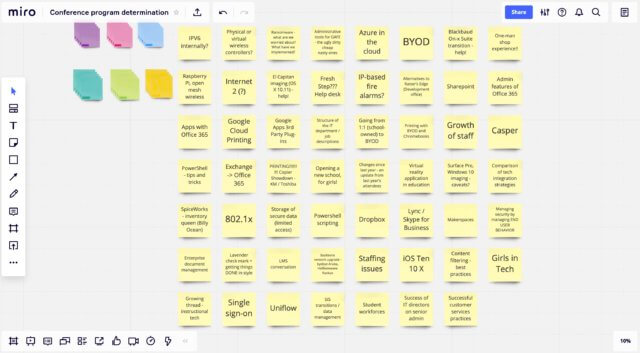
Miro has a simple, though slightly obscure, way to import the topics from your Google doc into separate sticky notes. If you try the obvious approach —bulk copy all the topics and paste them directly into Miro — they’ll end up in a single block of text. Instead, open any spreadsheet program (e.g. Excel, Numbers, or Google Sheets) and paste the topics into the top left-hand cell. They will fill the leftmost column, with one topic per row. Now copy all these cells and paste them into Miro. Each topic will be added to a new sticky note, nicely laid out in a grid.
Here’s an example: the topic list shown in Part 3…
…turned into a set of Miro sticky notes via the above copy-paste-copy-paste process.
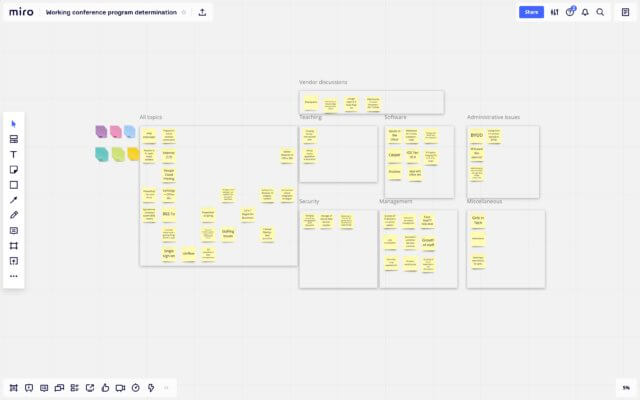
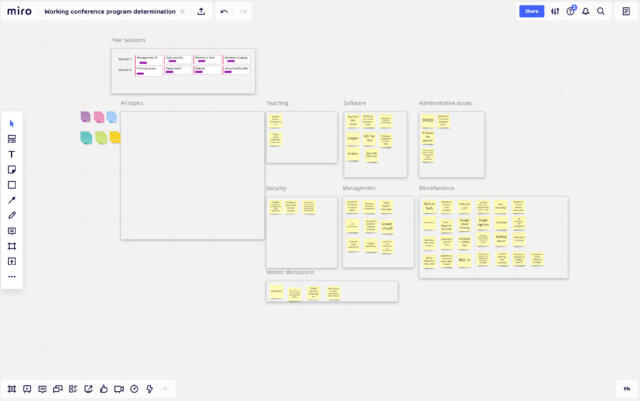
Process participant information: cleaning up and clustering topics
Once you’ve created a board of imported topics, copy it to a new board for the small group to work on. (In Miro, click on the name of the board in the top left-hand corner and click “Duplicate”.) This keeps the original topics available for reference if needed.
The next task is to review the topics and check that they’re clearly expressed. If a topic is unclear, rewrite the note or discard it. As you review the notes, notice themes and create a Miro frame for each one, plus a Miscellaneous frame for isolated ideas. Cluster topics by dragging sticky notes out of the original grid into the appropriate frames, as shown below.
The small group should have agreed on conventions for working on the topic board and identifying and collecting sticky notes that eventually become peer session topics. There are many ways to do this. For example, you can:
Use a specific sticky note color to indicate a potential or definite peer session topic. (You can change the color of an existing note from its context menu.)
Create a separate frame for topics that will become peer sessions.
Create frames or a space on the board for topics and frames that have been reviewed and are not going to be incorporated into the conference program.
Process participant information to determine the peer conference program
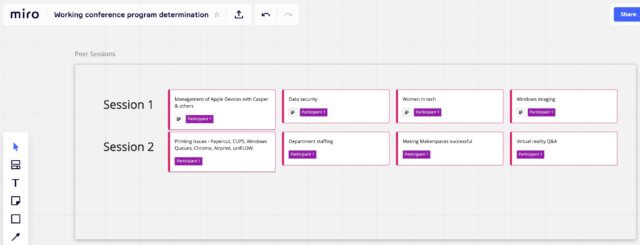
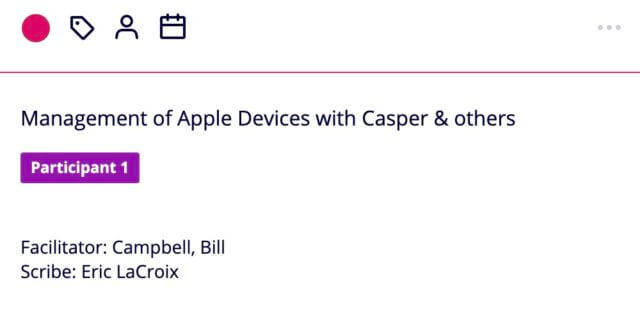
Use the process described in Chapter 22 of my book Event Crowdsourcing to determine the peer sessions you will offer, pick leaders and/or facilitators for each session, and schedule sessions into your conference program time slots. As you decide on each session, drag its sticky note into a “Peer Sessions” frame, as shown below.
In Miro, you can switch the type of a sticky note to a card. I recommend doing this for your chosen peer session sticky notes, since Miro cards provide you with a structured way to add data, like the names of session leaders, a long description, etc.
Distributing your peer conference schedule
As soon as you’ve created your peer conference schedule, distribute it appropriately to all participants. You could publish the schedule on your conference website, email it as a Google Doc, or supply it as a link in Zoom chat. Remember to also inform session leaders when their sessions will be held, and be available to answer any questions they might have. I also recommend distributing a version of the introductory handouts for peer sessions that are included in two of my books (Appendices 4 & 5 in Conferences That Work, or Appendix 6 in Event Crowdsourcing).
All that remains is to prepare for and run your online peer conference, which I’ll cover in the final post of this series.
Conclusion
First, a big thank you to the super-creative Liz Lathan of Haute Dokimazo for sharing with me how she collects and begins to process participant information online. Liz figured out how to use Mural to do this — the Miro process I’ve described above mirrors hers.
So far, in the first four posts of this series, I’ve:
Part 1 of this series of posts gave an overview of what’s involved in implementing participant-driven breakouts in Zoom. Part 2 explains how to prepare for The Three Questions using Zoom breakout rooms. Read them before diving into this post!
In this post (Part 3) I’ll cover how to run The Three Questions using Zoom breakout rooms.
Preparing staff to run The Three Questions in Zoom
As described in Part 2, each breakout room must be staffed by a facilitator and one or preferably two scribes. Before the breakout sessions of The Three Questions start, the facilitator and scribes need to know what they need to do, and have the necessary tools to do it.
Staff tools
I recommend that facilitators and scribes run Zoom on a personal computer, rather than a mobile device. This will allow them better simultaneous access to both Zoom and additional shared docs — typically a set of directions and a place for scribed participant responses, as described below. (Although less critical, I’d encourage participants to join the meeting on a PC too, if possible.) At the start of the meeting, make the facilitators Zoom co-hosts, so they can manage participants (mainly mute/unmute) in their Three Questions breakout room.
Each facilitator needs a countdown timer with a visual display: usually, a phone timer app — for example, Apple’s Clock. Displaying remaining time on the facilitator’s webcam is a simple way to keep sharing on schedule. (Hopefully, one day, Zoom will provide this functionality in their software.) For participants who join by telephone, the facilitator should give them a verbal “half-time” and “times up” message when needed.
Facilitators also need a way to track the time remaining in their breakout room, so they can ensure their room will finish as close as possible to the agreed upon time for all rooms.
Each scribe needs access to a place to scribe the responses to the second of The Three Questions: (the topics, issues, and challenges that participants want and need). Any online shared document can be used for this.
Here’s an example of a topic list created at a technical conference.
Three Questions facilitator training
Ask your facilitators to read Chapter 18 of Event Crowdsourcing or Chapters 31 & 32 of The Power of Participation so they are familiar with running The Three Questions. Decide on the sharing time, typically around 2 minutes, for each participant. Communicate it to the facilitators, so they will all be able to end their session at approximately the same time. Because all Zoom breakout rooms close at the same time, emphasize that time keeping is important, so that all participants get to share and everyone has the same time.
Three Questions scribe training
Explain to the scribes that their job is to record concisely the topics, issues, and challenges that participants share in response to the Second Question only. Introduce each scribe to their session scribing partner, and have them decide who scribes for the first sharer. Give your scribes the link to the shared online document in advance. Ask them to practice entering a few topics before their session starts.
When using a shared Google Doc, editors are assigned arbitrary names, shown in color during editing. It can be helpful for two scribes in the same session to learn each other’s assigned name before the session starts, so they can check on what their partner is writing.
Scribes can be participants too — when there are two scribes per session, one can scribe topics for the other’s sharing. Suggest that scribes alternate scribing for participants: one for the first participant, the other for the second, and so on.
If a topic is mentioned for which one or more participants have expertise and/or experience (the answer to the Third Question) it can be helpful to make a note of their names so they can potentially tapped as leaders or facilitators for the main conference breakout sessions.
It’s likely that some topics will be suggested in more than one of the separate Three Questions breakouts, or by several people in the same session. Since all scribes will be using the same Google Doc, it’s helpful for scribes to keep an eye on all the topics that are appearing during the breakouts. For a repeated topic, scribes can add an “x” at the end of the original topic line each time. Sometimes the topic will be similar but not the same as another topic. In this case it should be entered as a new item.
Running The Three Questions in Zoom Breakout Rooms
Before running The Three Questions, assign facilitators and scribes to specific numbered breakout rooms. Remember that breakout room assignments will be random. The main group facilitator or another designated staffer should, therefore, promptly move facilitators and scribes to the correct number room as soon as the rooms open. (See the section “Preparing breakout rooms” here to learn how to do this.)
At this point you’ll have a set of Zoom Breakout Rooms, each populated by an equal number of participants and a trained facilitator and scribe(s). Have everyone mute their audio except the facilitator and scribes.
Determining who shares next
During seated face-to-face meetings, it’s easy to keep track of who has or hasn’t yet shared by their location in the room. Online, it’s harder to track who hasn’t yet shared without a little help. (Don’t assume that a gallery view of participants will remain unchanged throughout the session; the display changes unpredictably if participants arrive or depart.)
Consequently, the facilitator should choose who shares next. (See this post for more information on “who goes next?” process.) To do this, each Three Questions facilitator must have their participants list visible. They then call on participants in turn, maintaining a written list of those who have shared. If the facilitator has a printer, track people who have shared on a printed screen shot of the attendee list.
Because people may join a session late, the facilitator should always check that everyone has shared.
Individual sharing
As each person shares, the Three Questions facilitator monitors their progress. If they are spending too much time on the First Question, let them know. It’s helpful to let sharers know when half their time is up, at which point they should be well into their answer to the Second Question.
If many people aren’t using their full time, point this out and encourage participants to say a little more. (But don’t insist that anyone share more than they originally offer.)
It’s a facilitator’s job to prevent people sharing too long, ensuring that everyone gets an equal amount of time to contribute.
When sharing in a Three Questions breakout is complete
When everyone in a Three Questions breakout has shared, there should be some free time left in the session. If desired, the session facilitator can solicit additional short expressions of interest in the uncovered topics, and perhaps suggestions of additional topics sparked by what has been heard in the group.
Each Three Questions facilitator should let the meeting facilitator know (typically by private message in Zoom’s text chat) when their session is over. The meeting facilitator can then close the breakout rooms once all breakouts are complete.
Participants will have met a useful number of other participants and learned useful information about each other, namely, details of their association with the meeting topic, their wants and needs for the meeting, and their relevant expertise and experience.
Conference organizers will have a comprehensive list of topics, issues, and challenges that are top-of-mind for attendees, plus identified participants who can facilitate/lead/present on them.
Conclusion
So far, in the first three posts of this series on participant-driven breakouts in Zoom, I’ve:
provided a brief recap of the benefits of peer conferences;
given a big picture overview of how you can hold one online;
explained how to prepare to run The Three Questions online in Zoom; and
covered how to run The Three Questions online in Zoom.
The next post (Part 4) will describe in detail how to carry out step #2 — creating an optimum conference program from the information uncovered in step #1— using Zoom.
Part 1 (an overview of what’s involved in implementing participant-driven breakouts in Zoom) is available here.
Part 2 (preparing for The Three Questions) is available here.
Parts 4 and 5 are now available.
Check back on this blog for future posts on implementing participant-driven breakouts in Zoom. To ensure you don’t miss the rest of the series, subscribe.
Part 1 of this series of posts gave an overview of what’s involved in implementing participant-driven breakouts in Zoom. Read it before diving into this post!
In this post (Part 2) I’ll cover most of Step #1 of the previous post: preparing for The Three Questions using Zoom breakout rooms.
If necessary, get familiar with Zoom, including breakout room functions, before proceeding. I’ve included links to the relevant Zoom tutorials and reference articles, when appropriate, in the following instructions. Once you’ve done that, you’re ready to start creating participant-driven breakouts in Zoom.
What is The Three Questions, and why use it?
I developed The Three Questions in 1995 as a fundamental opening process for peer conferences. It’s described and explained in all three of my books. You can find the most detailed implementation in Chapter 18 of my 2019 book, Event Crowdsourcing.
The Three Questions is the most effective way I know to assist a group of people to get to know each other usefully, safely, and authentically. It’s quite different from the common but often artificial and awkward icebreaker approaches used in “team-building” and “getting-to-know-you” activities because it focuses on core information we want to know about the people we’re currently with: why they’re present, what they want to do/learn about/discuss, and what useful resources they possess.
Besides connecting people around their fundamental interests, The Three Questions is one of the best formats for discovering important topics, issues, and questions that were previously unknown to event organizers and a majority of the participants, as well as associated levels of interest.
Zoom’s key tool for effective active learning and connection — Breakout Rooms
Frequent and well-designed small group work is the key to creating active learning and connection at any meeting. Zoom’s tool for small group work is Breakout Rooms.
Zoom allows facilitators to speedily split a meeting into up to 50 separate sessions. Participants can be allocated to these separate sessions automatically or manually.
If you’re not familiar with breakout rooms, take time to review Zoom’s tutorials. Practice using them at small group meetings before employing them for a significant event!
Preparing for The Three Questions in Zoom
Learn about The Three Questions
First, read the detailed instructions on how to run The Three Questions which you’ll find in my books:
Event Crowdsourcing [2019] (Chapter 18) [recommended: most comprehensive and recent information]
The Power of Participation [2015] (Chapters 31 & 32)
Conferences That Work [2009] (Chapter 25, pages 260-265)
Decide on the number and size of your Three Questions breakout groups
Next, decide the number and size of your breakout groups. This will depend on:
the number of attendees;
the duration and scheduling of your conference; and
the time you plan to devote to The Three Questions.
As I’ve written elsewhere, these days, most meetings are small meetings (less than 100 attendees) and that’s a good thing! So the following barebones examples offer suggestions for online conferences with up to 100 attendees. They don’t include a closing session, which I recommend — I’ll make suggestions for appropriate formats in a later post.
With care, more staffing, and a beefier Zoom license, The Three Questions can definitely be run successfully at larger online events.
Example 1: 60 attendees, ~4½ hour event (includes ~75 minutes of breaks), two one-hour breakouts with three simultaneous sessions per slot (six peer sessions)
Suggested schedule:
Five minutes for the welcome.
Fifteen minutes to explain The Three Questions, for attendees to write their answers, and divide attendees into three breakout rooms with 20 people in each.
One hour for each (simultaneous) Breakout Room for The Three Questions; two minutes sharing per person, with a five-minute break after 30 minutes.
Fifty minutes for conference organizers to build the nine-session conference program and set up Breakout Rooms for the resulting sessions. See the Part 1 post for attendee options during this time.
Ten minutes for attendees to review the program and decide which session to attend.
One hour for the first set of peer sessions.
Ten-minute break.
One hour for the second set of peer sessions.
(Optional, but recommended) Closing session; for example some form of Plus/Delta.
Example 2: 100 attendees, ~6½ hour event (includes ~140 minutes of breaks), three one-hour breakouts with four simultaneous sessions per slot (twelve peer sessions)
Suggested schedule:
Five minutes for the welcome.
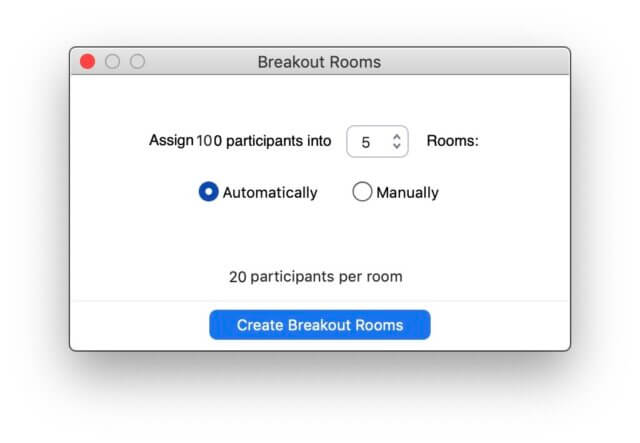
Fifteen minutes to explain The Three Questions, for attendees to write their answers, and divide attendees into five breakout rooms with 20 people in each.
One hour for each (simultaneous) Breakout Room for The Three Questions; two minutes sharing per person, with a five-minute break after 30 minutes.
Ninety minutes for conference organizers to build the twelve-session conference program and set up Breakout Rooms for the resulting sessions. See the Part 1 post for attendee options during this time.
Fifteen minutes for attendees to review the program and decide which session to attend.
One hour for the first set of peer sessions.
Fifteen-minute break.
One hour for the second set of peer sessions.
Fifteen-minute break.
One hour for the second set of peer sessions.
(Optional, but recommended) Closing session; for example some form of Plus/Delta.
Both of the above examples allow each participant ~2 – 2½ minutes to share their answers to The Three Questions with their groups. As described in my books, when calculating sharing duration add at least ten seconds per participant for the inevitable pauses between shares.
If you want to adjust the time allocated to The Three Questions, you can adjust the size of the breakout groups and/or the sharing time for each participant. But don’t stray too far from the suggested parameters of the above examples. And don’t forget to include breaks!
If at the start of the event, the number of participants turns out to be significantly different from what was expected, facilitators should be ready to collectively adjust sharing time so that the total sharing still fits comfortably into the scheduled Three Questions session length. Each Three Questions breakout should use the same sharing time per participant, so all breakouts can close at the same time.
Staffing an online Zoom peer conference
An experienced practitioner who’s familiar with Zoom can often handle the facilitation and technical support for very small meetings. Online Zoom peer conferences, however, require multiple staffers, who need to be identified and prepared in advance. Typically they will be set up as Zoom co-hosts. I recommend the following staffing:
At least one staffer handling technical issues: user support, muting/unmuting participants appropriately, assigning facilitators to their Three Questions rooms, and pre-assigning attendees to breakouts in Step #2.
A meeting facilitator, who introduces The Three Questions to the entire group. (This person can also be a facilitator for one of the Three Questions Breakout Rooms.)
A facilitator for each Three Questions Breakout Room, who keeps track of sharing time, and ensures the sharing runs smoothly.
One or two scribes for each Three Questions Breakout Room. (Two scribes will have a much easier task than one.) Ideally, scribes should have some conference topic experience so they can summarize attendee responses accurately and concisely. During each Three Questions session, scribes summarize answers to the second question, usually in a shared Google Doc.
A small group of subject matter experts who will review the topics, issues, and challenges uncovered in Step #1, build a responsive peer session program, find leaders for each peer session breakout, and publish the resulting program.
Each peer session will need one or more participants who lead and/or share useful experience or expertise and/or facilitate the session.
As for any conference, adequate preparation and, if needed, training, for meeting staffers is crucial for a smoothly run event. Until everyone involved is experienced in supporting online meetings, a pre-meeting mock run-through on Zoom is strongly recommended!
Preparing attendees for a peer conference
At in-person meetings, facilitation via verbal directions works well. Because online participants can be more easily distracted or late, I recommend distributing a short preparatory online document for participants to read before the meeting.
Be sure to communicate in advance the importance of being present at the start of The Three Questions. The document should contain a short explanation of the value and format of a peer conference and a schedule. You don’t need to provide detailed information about The Three Questions. You can see some examples here and here.
The facilitator can share this document on-screen while introducing The Three Questions.
Introducing attendees to The Three Questions
One of the advantages of creating a peer conference online with Zoom is that participants don’t need to physically move to separate breakout rooms. At in-person events this takes time. Consequently, it’s simplest to introduce The Three Questions to attendees when they are all together in the main Zoom meeting room. Once the explanations are over, and participants have been given a few minutes to answer The Three Questions in writing, it’s easy to allocate them to their separate breakouts.
At the start of the peer conference, welcome attendees and then cover any housekeeping issues. Ask all attendees to turn on Zoom text chat, which supplies a useful way for facilitators, scribes, and participants to ask questions, and assist with format and technical issues. Also share links via screen share and/or text chat to the conference introductory document, and the online document that will contain participants’ responses to the second of The Three Questions: (the topics, issues, and challenges that participants want and need), as described in Part 3 of this series of posts.
The facilitator who introduces The Three Questions can use the same guidelines and scripts provided in my books, with the following minor variation. At the start of the introduction, ask attendees to have paper and pen available. Instead of passing out printed cards, the facilitator shares their screen, displaying a copy of The Three Questions card, and then introduces the exercise.
Allocating attendees to Zoom Breakout Rooms for The Three Questions
Once The Three Questions has been introduced, give attendees a few minutes of silent time to write down their answers. (As always, emphasize the importance of writing their answers.)
Once you’ve checked that attendees are ready to continue, it’s time to assign them to breakout rooms.
After creating the breakout rooms, click Options and make sure the following (and only the following) options are checked:
Move all participants into breakout rooms automatically.
Allow participants to return to the main session at any time.
Countdown after closing breakout rooms.
As soon as people are randomly allocated to their rooms, find your individual room facilitators and scribes on Zoom’s participant list and move them as needed to their correct room. (See the section “Preparing breakout rooms” here to learn how to do this.)
Congratulations! You’ve completed the major portion of Step #1. You’re well on your way to creating successful participant-driven breakouts in Zoom. Part 3 of this series covers how the breakout room facilitators run their Three Questions session.
Conclusion
So far, in the first two posts of this series, I’ve:
provided a brief recap of the benefits of peer conferences;
given a big-picture overview of how you can hold one online; and
explained how to prepare to run The Three Questions online using Zoom.
The next two posts will describe in detail how to:
run The Three Questions online (Part 3); and
carry out step #2 — creating an optimum conference program from the information uncovered in step #1— using Zoom (Part 4).
Part 1 (an overview of what’s involved in implementing participant-driven breakouts in Zoom) is available here, and Part 3 (how to run The Three Questions) is now available here.
Part 4 (how to process participants’ sharing to create an optimum conference program) is now available here, and Part 5 (how to run participant-driven breakouts in Zoom breakout rooms) is now available here.
Check back on this blog for these posts on implementing participant-driven breakouts in Zoom. To ensure you don’t miss them, subscribe to this blog.

 If people come to meetings to learn, how can we create the best environment for them to do so? It turns out that trust and safety are prerequisites for optimum learning at meetings. Let’s explore why.
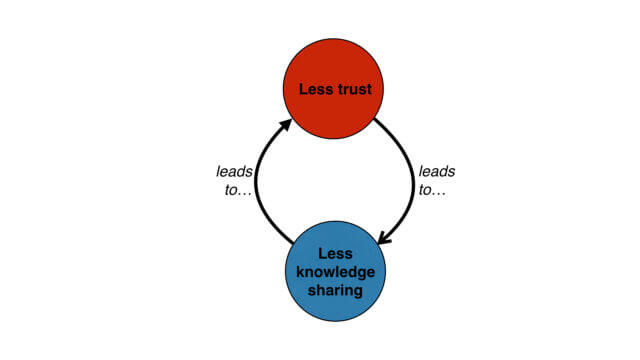
 Gamification “makes about as much sense as chocolate-dipped broccoli”. Education professor
 Right now I’m living at home, and the two workouts I do most often are my daily outdoor run and yoga. So it’s convenient that these options are the first two I see.
 Is most classroom practice astrology?

 1: Click on Participants in the Zoom toolbar at the bottom of your screen.
 3: Tap Rename, enter your desired new name, and tap Done.
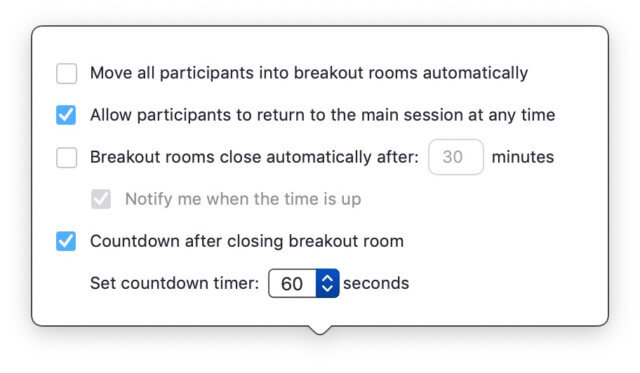 You’re ready to start the set of peer sessions! Tell participants they are about to be moved to their desired session and click Open All Rooms.
 Part 1