Not long ago, I designed and facilitated an online workshop that was marred by technical difficulties. The workshop was several hours long, and some (but not all) of the participants reported that my video feed froze at times. Luckily, my audio feed was fine.
Shortly afterward, I talked to a client who had participated in the workshop. I asked them about their workshop experience.
“I couldn’t see you half the time,” they said.
Uh oh.
“But it didn’t matter.”
Phew.
Yes, they loved the workshop.
Like many of my workshops, this one was about creating meaningful participation and engagement at events. And, as usual, it focused on experiential, active learning. Learning through experience, not by listening to me.
As long as my directions for the exercises could be heard, the participants didn’t need to see me for the workshop to be successful. The workshop wasn’t about me; it was about the participants’ learning experiences as they engaged with each other. It was about the experiential learning that took place, both about the others present and the ways the learning occurred through engagement.
Now, let’s flip this scenario for a moment.
Imagine an online meeting lasting several hours that is technically flawless but has no significant engagement.
I’ve “attended” countless meetings of this sort, and you probably have too.
None of these meetings was memorable. (Except perhaps a few especially excruciating ones that I had to attend for some unfortunate reason.)
I suspect you’ve forgotten 99% of such engagement-free meetings. Feel free to let me know if that isn’t the case.
I say 99% because there are a few people, like Paula Poundstone, to whom I would be happy to listen for hours. And perhaps you’ve had the good fortune to attend a meeting with someone like her. Alas, most engagement-free meetings don’t include a Poundstone.
I rest my case.
Meaningful engagement at events beats technical difficulties every time.
All too often, clients planning an event don’t spend enough time making hard but important event choices.
What is engagement?
A few months ago I designed and facilitated BizBash’s inaugural two-day leadership summit in Puerto Rico. 24 C-Suite executives discussed some of the event industry’s biggest current issues. One eye-opening takeaway for me was the radically different ways in which participants thought about and measured “engagement” at their events. Production companies focused on meeting micro-statistics. Brands were big on impressions generated. While as a meeting designer, I think about the emotional involvement or commitment of participants.
If folks in our own industry don’t agree (for completely legitimate reasons) on what the common term engagement means, how to measure it, and how to obtain it, is it surprising that our clients are unclear about their goals and objectives for their events?
We need to make event choices
Making event choices is hard but necessary. For one thing, as Seth Godin points out:
“You can’t create an event that’s intimate, open to all comers, proven, resilient for any weather, held outdoors and unique.”
–Seth Godin, Paths Not Taken
In addition, the blurry intersections between cultural, organizational, and participants‘ expectations, wants, and needs require us to understand the specific consequences of making event choices and the tradeoffs that result.
From my blog post: Whom is your event for?
Helping clients make choices
When designing meetings with clients, an important part of my work involves helping them uncover assumptions that impede realizing their goals and objectives. For example:
“Given the deteriorating evaluations for your annual conference, perhaps we should rethink a program comprised of expert presentations?”
“It’s been five years since we reviewed your goals and objectives for this meeting. Let’s revisit your vision to check if anything’s changed.”
Noticing and accepting that choices like these need to be made is a crucial first step. Once we’ve identified them, it’s helpful to document unresolved choices as part of the meeting design process.
We keep these choices in mind while working together to build an event that best attains the meeting’s goals and objectives. We evaluate potential design solutions, decide between the alternatives, and, perhaps after several design iterations, agree on what to do.
One last point. Clients have to remember that you can’t please everyone! Whatever hard choices get made, someone’s going to be upset.
That’s why they’re hard choices. But we need to identify and make them if we’re going to end up with an optimum meeting design.
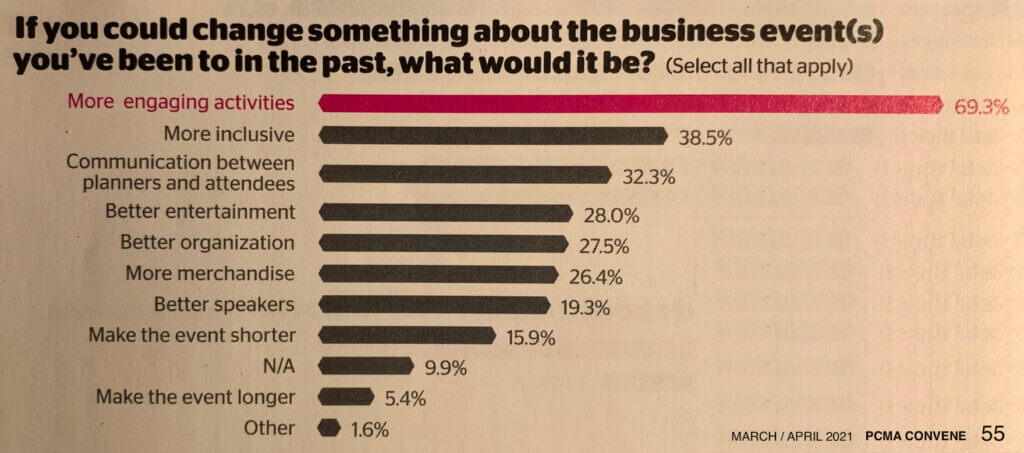
I’m a longtime proponent of more engaging activities, participation, and connection around relevant content at events. Sometimes, I feel like I’m whistling in the wind. So I felt happy when I saw the following in a global poll by PCMA of 4,500 members of Generation Z.
If you could change something about the business event(s) you’ve been to in the past, what would it be?
(In case you were wondering, interviewees could choose more than one option.)
Over two-thirds of the respondents chose “more engaging activities” as something they wanted to change at their meetings!
Now I’m not a fan of what I’ve called the Generation XYZ baloney. I think core motivations to attend events remain fixed over time. To put it another way, human nature doesn’t really change between generations, though circumstances and the consequent opportunities do. (And it’s the latter we should focus on.)
Whatever your beliefs on generational culture, this finding means that stakeholders need to act on building more engagement, participation, and connection into meetings if they are serious about improving the attractiveness and effectiveness of events.
We’ve known how to make meetings participation-rich and connection-rich for decades. Younger generations are more exposed to active learning formats in school, like flipped and group learning. Yet most meetings shun these powerful modalities for the same old relatively ineffective lecture formats.
This poll suggests that the young are seriously dissatisfied with current opportunities for meaningful engagement at events. As time passes, these folks will move into positions with increasing responsibility and influence.
After our prime Thanksgiving dinner, I was sleepily washing a large turkey foil platter when I noticed its embossed central message: “Support the bottom.”
I’m going to blame the tryptophan in the turkey for causing me to muse, from a facilitation perspective, about the significance of this unexpected Prime Directive. I have no other excuse.
Support the bottom
It makes sense. We don’t want our heavy turkey to break through or slide off the tray as we’re bringing it to the feast. The manufacturer suggests we shouldn’t take for granted the strength of the thick aluminum foil holding our main course. We should be mindful that the bottom of our feast needs support.
Well, when working with a group of people, the “bottom” of the group also needs support.
Making assumptions
During group work, it’s tempting to assume that things are going well when we’re hearing from many people. When there’s significant interaction between group members. When folks are coming up with new ideas and interesting approaches to explore.
So it’s easy to overlook some people. Without checking, you might not see them. After all, they’re not bringing attention to themselves. People who say little or nothing. People who are distracted or disengaged.
It’s important to suspend judgment of these folks. There have been many times when I’ve been understandably silent/disengaged/distracted during meetings, and I’m sure everyone else has too. Perhaps:
what’s going on is of no interest;
we’re completely lost and confused;
feeling unwell is wrecking our attention;
we’re seriously short on sleep; or
a personal crisis is all we can think about;
and you can probably think of plenty of additional unexceptional circumstances when someone may be currently incapable of doing useful work in a group. We might say they have hit rock bottom.
But then there are the border cases. Frequently, there are people who might just need a nudge. They are at a momentary personal bottom, and they could use some support. A reminder, a reason, an opportunity to engage or reengage.
So what do we do?
How can we support group members at a (hopefully, momentary) bottom?
Noticing
The first step is noticing them. When working with a small group, the quiet folks are easy to spot. A good facilitator will gently check to see if they have something to say, and bring them into the work if they’re willing. With large groups noticing the quiet folks is hard, because, obviously, they’re not drawing attention. If you, as a facilitator, are concentrating on the people who are contributing and interacting — an important piece of your job — it’s easy to overlook those who aren’t.
How can we avoid missing the quiet folks in large groups? By making time for you to notice them! Luckily, this is typically part of good meeting design — it’s not something that you need to awkwardly or artificially introduce. Good large group work includes short breakouts, where impromptu small groups meet, think, discuss, and share. While these activities are going on, it’s fairly easy for a facilitator to roam the room and pick up on disengaged attendees. (Unfortunately, this is much harder to do online, as I mentioned in last week’s post.)
Engage/reengage
The second step is to provide regular opportunities for the “bottom” folks to engage or reengage. Appropriate small group work, like pair or trio share, is an obvious way to do this. When working in small groups, check to see if participants who haven’t spoken for a while have anything they’d like to add. If you’re running a fishbowl or fishbowl sandwich, ask that people not share more than once until everyone’s had a chance to contribute. And be patient when asking people to share. Staying quiet while people are thinking about whether they want to speak and what they might want to say is a tangible form of respect. So remember to shut up and listen.
Don’t expect to engage everyone
Finally, bear in mind that, no matter how brilliant a facilitator you are, your meeting will not be perfect for everyone. Hey, if it’s the best meeting ever for just one person present, I think that’s great! Because you can’t please everyone — and you shouldn’t even try to.
Instead, do your best to respectfully and appropriately engage as many people as you can. Yes, the “bottom” participants will generally need greater support. But focus your time and attention on maximizing the overall group energy, with as many people as possible actively on board.
You may not hear much of the resulting Thanksgiving. But you’ll know you did the best cooking you could.
Part 1 of this series of posts gave an overview of what’s involved in implementing participant-driven breakouts in Zoom, and Part 2 explained how to prepare for The Three Questions.Part 3 describes how to run them using Zoom breakout rooms, and Part 4 covers how to create an optimum conference program. Read them before diving into this post! This post, Part 5, the last in this series, explains how to run your peer conference using Zoom breakout rooms.
Overview
Once you have developed and distributed your conference program, as described in Parts 1 – 4 of this series, it’s time to run it!
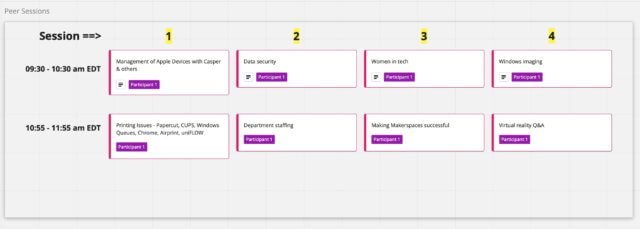
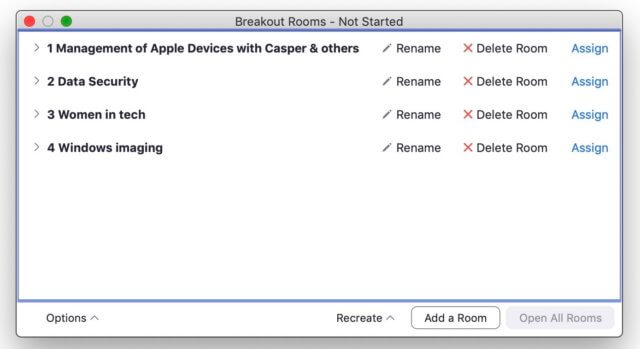
You’ll use the same procedure for every conference time slot. First, create breakout rooms for the peer sessions scheduled in the time slot, and then name each room with a number and session topic.
Currently, Zoom has no easy mechanism for participants to move from one session to another. So it’s best to share the conference program with participants in advance, and, for each time slot, ask them to pick the session they want to attend. I’ll describe the simplest (and most common) way to do this below.
Right before each session time slot, participants are assigned to the Zoom breakout room associated with their chosen session. Once this is done, the breakout rooms are opened and the sessions commence.
At the end of each session, participants return to the main Zoom meeting and indicate their choice for the next set of sessions. After renaming breakout rooms with the next set of session topics, the cycle repeats.
Moving between breakout rooms
At in-person conferences, participants are normally free to leave a breakout session and move to another one.
At an online conference using the Zoom platform, once participants are in a specific breakout room/session, they can only leave the room and return to the main Zoom meeting. They cannot move themselves to another breakout room unless they have been given co-host status in Zoom.
[UPDATE. Since September 2020, Zoom allows participants to move themselves to another breakout room. Nevertheless, I still strongly recommend having a staff member stationed in the main Zoom room (see below), as some participants may not know how to change their breakout room or have some other concerns that this staff member can address.]
Although one could give all participants co-host status so they could move themselves to different sessions, I don’t recommend it. Co-hosts have a lot of power in a Zoom meeting, and one malicious or careless participant could really mess up your meeting.
One big advantage of peer conferences is that opening with The Three Questions leads to conference programs that are much more likely to reflect participants’ genuine wants and needs. As a result, moving between simultaneous breakouts is relatively rare at in-person events.
Nevertheless, people will occasionally want to move to a different session during a time slot. (The most common reason, in my experience, is that they chose or were assigned to the wrong breakout room by mistake.) As a result, while you’re running sets of peer sessions, you’ll need to keep a staff member stationed in the main Zoom room. This person should have co-host status, so they can reassign participants who return to the main meeting from a breakout room and ask to join a different session.
Preparing participants to choose their desired session
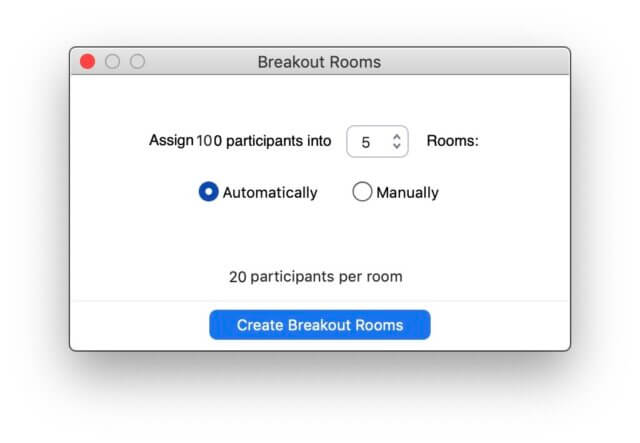
Before each set of sessions begins, one of your staff (a Zoom host or co-host) creates a set of breakout rooms that match the peer sessions about to be held. Since you’re going to assign participants to specific rooms, pick the Manual option when creating the rooms.
While creating breakout rooms, provide participants with a numbered list of the breakout sessions for the time slot (see below). If you’re using Miro, add session room numbers and export or screenshot the relevant portion of the conference program.
To keep everyone in Zoom, I suggest having a host or co-host display the list, using screen sharing in the main Zoom meeting.
Now it’s time for participants to pick the peer session they want to attend. While they’re all present, display the current session choices and explain that to assign them to the correct session they’ll edit their display name to add the breakout room number in front of their name. Give them an example: e.g., “If I want to attend the Data Security session next, I need to change my name from Adrian Segar to 2 Adrian Segar.”
This is a common technique these days, and many people who are familiar with Zoom know how to change their Zoom meeting name while in the meeting. However, since some participants won’t know how to do this, provide instructions like these:
How to change your screen name on a PC during a Zoom meeting
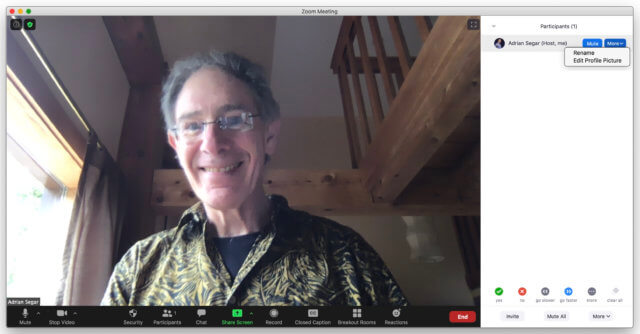
1: Click on Participants in the Zoom toolbar at the bottom of your screen.
2: Hover the mouse pointer above your name until you see the option to select More.
3: Once you see it, click on it and select Rename.
4: Enter your desired name in the text field and click Rename to confirm your selection.
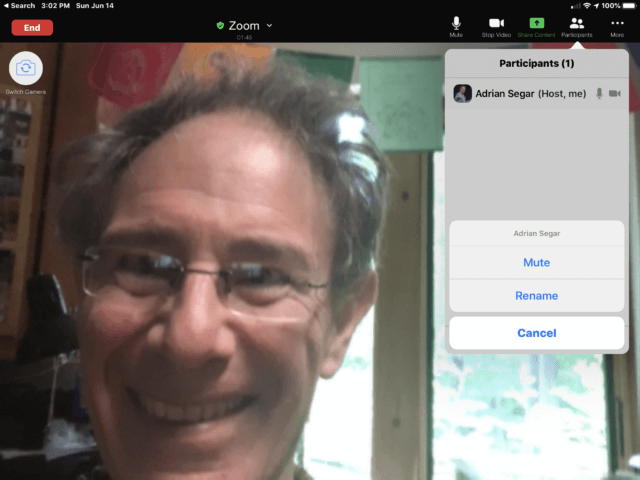
How to change your screen name on a mobile device during a Zoom meeting
1: If the toolbar isn’t visible, tap on the screen to display it. Tap Participants to bring up the list of meeting participants.
2: Find your name on the list and tap on it.
3: Tap Rename, enter your desired new name, and tap Done.
Have participants choose their peer session breakout rooms
Once participants understand how to change their Zoom name to indicate the breakout session they want, have a staff member monitor the name changes on the Zoom Participants list, and assign them to the correct room. Make sure that session leaders are present and assigned to the correct room before proceeding. Sometimes there are a few people who don’t add their room number to their name. Have another staffer contact them by text chat or directly in the Zoom meeting, to check whether they need help. If there’s anyone who can’t figure out how to change their name, ask them which session they want to join. Pass the participant’s name and desired session to the breakout room assigner.
Explain to participants that if they wish to leave the session they’re in, they should click Leave Room. This will bring them back to the main room meeting, where a staffer can move them into another peer session.
Start a set of peer sessions
Before opening the Zoom breakout rooms, check the Breakout Room Options, which should look like this. (You can change the countdown timer setting if desired.)
You’re ready to start the set of peer sessions! Tell participants they are about to be moved to their desired session and click Open All Rooms.
Ending a set of peer sessions
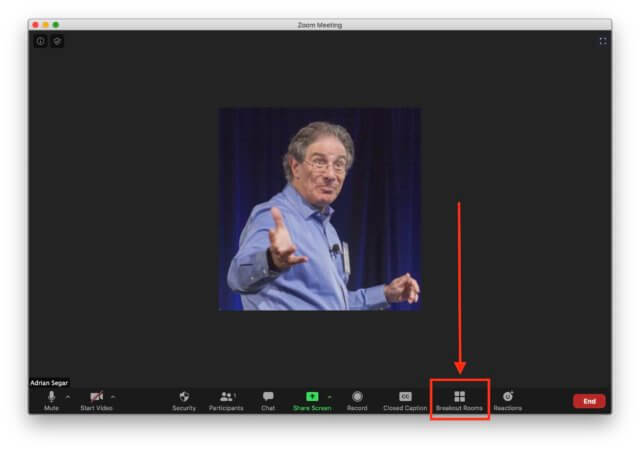
Five or ten minutes before the sessions are scheduled to end, let everyone know how much time is left in the session. Do this by clicking Breakout Rooms in the Zoom toolbar. Then click Broadcast a message to all, enter your message, and click Broadcast.
A minute before the sessions are over, click Breakout Rooms and then click Close All Rooms. In a minute or less, everyone will be back in the main Zoom meeting.
Do it again!
Repeat the above process for each set of peer sessions until all sessions have been run.
To create a fresh set of breakout rooms, click Recreate and then Recreate All Rooms in the Breakout Rooms window.
That’s how you run your peer conference using Zoom!
shown how to run your peer conference using Zoom breakout rooms (this post).
A final point. As you know, peer conferences use the conference arc design, which includes a closing process that’s tailored to the wants and needs of the meeting stakeholders (here’s an example). I haven’t covered this important conference phase in this series, but you should spend time thinking about and designing appropriate closings for your online event. Perhaps I’ll write more about what this might look like, and how it can be implemented online in a future post.
If you’ve been planning to implement participant-driven breakouts in Zoom, I hope this series has been helpful. As always, I welcome your thoughts, questions, and suggestions in the comments below.
Part 1 of this series of posts gave an overview of what’s involved in implementing participant-driven breakouts in Zoom. Part 2 explains how to prepare for The Three Questions, and Part 3 explains how to run them using Zoom breakout rooms. Please read them before diving into this post! In this post (Part 4) I’ll cover Step #2 — how to process the participant information uncovered in Step #1 to create an optimum conference program. Part 5, the last in this series explains how to run your peer conference using Zoom breakout rooms.
Creating and convening your conference program group
By the end of The Three Questions (see Part 3), your scribed Google document contains a rich list of your participants’ desired and needed topics, issues, and current challenges. Now it’s time for a small conference program group of conference leaders and subject matter experts to use participants’ answers to the Second Question to create an optimum conference program. (Part 1 lays out options for your participants while this is going on.)
Make sure your small group contains someone from each Three Questions breakout group. These people can identify participants in their group who have the expertise, experience, or interest in leading or facilitating the sessions you choose.
The conference program group can meet in a variety of ways. Perhaps participants are listening to a presentation while your small group meets in a Zoom breakout room. If attendees are taking a meal break, you can use the current Zoom meeting, and restrict attendance to the conference program group. Or you can simply set up a separate Zoom meeting for the small group to hash out the upcoming conference program.
Building your optimum conference program
The small conference program group needs a tool to review and organize the topics that participants have requested and suggested.
Tools for in-person meetings
At in-person meetings, I use the process Post It! for Programs, described in Chapter 22 of my book Event Crowdsourcing. Read Chapter 22 to understand the detailed process I summarize in this post. (You may find Chapter 21, Peer Session Selection and Sign-up useful too.)
The small group starts with a wall of participants’ topics, written on large sticky notes. We clean up, cluster, and consolidate the topics, moving notes around and rewriting them as needed. The small group reviews and rates the results, and chooses the most relevant topics. Finally, we find leaders and/or facilitators for these peer sessions and schedule them into an optimum conference program.
Tools for online meetings
Two tools that provide the above functions for online meetings are Miro and Mural. You can read a useful comparison of their features and user interface here. Miro has a free limited version, and Mural offers a free limited-time introductory plan. It’s worth upgrading to a paid plan for either of these products if you expect to use them regularly.
In this post, I’ll outline how to use Miro to collaborate remotely with your small group. I don’t know Mural as well, but you should be able to use it in a similar fashion. Even though the basic concepts can be quickly grasped, both Miro and Mural provide a rich variety of functionality. So you and your small group members should practice using them. Before the conference, give small group members a link to a “playground” Miro board where they can freely explore Miro’s frames, sticky notes, and tools.
Importing participant topics into Miro
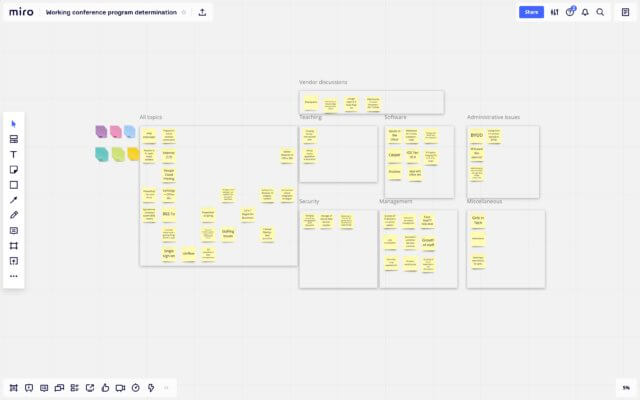
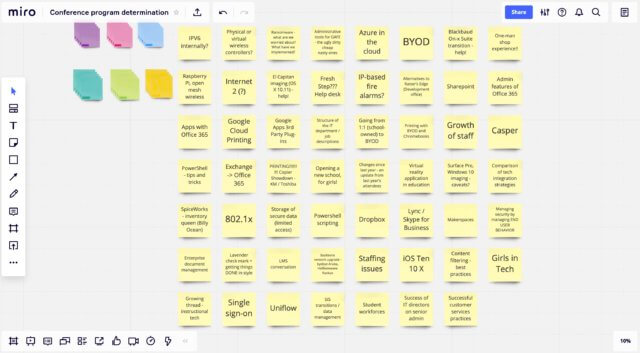
Miro has a simple, though slightly obscure, way to import the topics from your Google doc into separate sticky notes. If you try the obvious approach —bulk copy all the topics and paste them directly into Miro — they’ll end up in a single block of text. Instead, open any spreadsheet program (e.g. Excel, Numbers, or Google Sheets) and paste the topics into the top left-hand cell. They will fill the leftmost column, with one topic per row. Now copy all these cells and paste them into Miro. Each topic will be added to a new sticky note, nicely laid out in a grid.
Here’s an example: the topic list shown in Part 3…
…turned into a set of Miro sticky notes via the above copy-paste-copy-paste process.
Process participant information: cleaning up and clustering topics
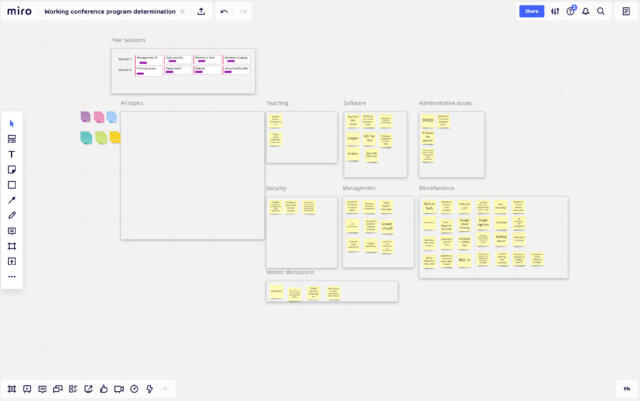
Once you’ve created a board of imported topics, copy it to a new board for the small group to work on. (In Miro, click on the name of the board in the top left-hand corner and click “Duplicate”.) This keeps the original topics available for reference if needed.
The next task is to review the topics and check that they’re clearly expressed. If a topic is unclear, rewrite the note or discard it. As you review the notes, notice themes and create a Miro frame for each one, plus a Miscellaneous frame for isolated ideas. Cluster topics by dragging sticky notes out of the original grid into the appropriate frames, as shown below.
The small group should have agreed on conventions for working on the topic board and identifying and collecting sticky notes that eventually become peer session topics. There are many ways to do this. For example, you can:
Use a specific sticky note color to indicate a potential or definite peer session topic. (You can change the color of an existing note from its context menu.)
Create a separate frame for topics that will become peer sessions.
Create frames or a space on the board for topics and frames that have been reviewed and are not going to be incorporated into the conference program.
Process participant information to determine the peer conference program
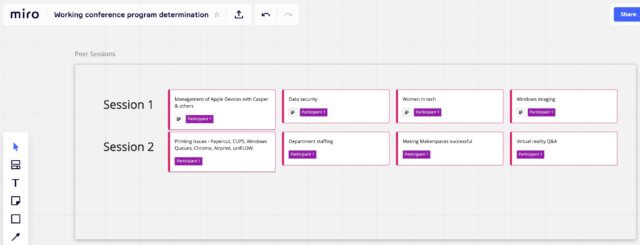
Use the process described in Chapter 22 of my book Event Crowdsourcing to determine the peer sessions you will offer, pick leaders and/or facilitators for each session, and schedule sessions into your conference program time slots. As you decide on each session, drag its sticky note into a “Peer Sessions” frame, as shown below.
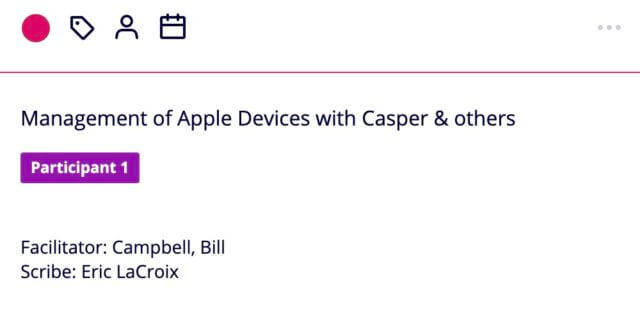
In Miro, you can switch the type of a sticky note to a card. I recommend doing this for your chosen peer session sticky notes, since Miro cards provide you with a structured way to add data, like the names of session leaders, a long description, etc.
Distributing your peer conference schedule
As soon as you’ve created your peer conference schedule, distribute it appropriately to all participants. You could publish the schedule on your conference website, email it as a Google Doc, or supply it as a link in Zoom chat. Remember to also inform session leaders when their sessions will be held, and be available to answer any questions they might have. I also recommend distributing a version of the introductory handouts for peer sessions that are included in two of my books (Appendices 4 & 5 in Conferences That Work, or Appendix 6 in Event Crowdsourcing).
All that remains is to prepare for and run your online peer conference, which I’ll cover in the final post of this series.
Conclusion
First, a big thank you to the super-creative Liz Lathan of Haute Dokimazo for sharing with me how she collects and begins to process participant information online. Liz figured out how to use Mural to do this — the Miro process I’ve described above mirrors hers.
So far, in the first four posts of this series, I’ve:
Part 1 of this series of posts gave an overview of what’s involved in implementing participant-driven breakouts in Zoom. Part 2 explains how to prepare for The Three Questions using Zoom breakout rooms. Read them before diving into this post!
In this post (Part 3) I’ll cover how to run The Three Questions using Zoom breakout rooms.
Preparing staff to run The Three Questions in Zoom
As described in Part 2, each breakout room must be staffed by a facilitator and one or preferably two scribes. Before the breakout sessions of The Three Questions start, the facilitator and scribes need to know what they need to do, and have the necessary tools to do it.
Staff tools
I recommend that facilitators and scribes run Zoom on a personal computer, rather than a mobile device. This will allow them better simultaneous access to both Zoom and additional shared docs — typically a set of directions and a place for scribed participant responses, as described below. (Although less critical, I’d encourage participants to join the meeting on a PC too, if possible.) At the start of the meeting, make the facilitators Zoom co-hosts, so they can manage participants (mainly mute/unmute) in their Three Questions breakout room.
Each facilitator needs a countdown timer with a visual display: usually, a phone timer app — for example, Apple’s Clock. Displaying remaining time on the facilitator’s webcam is a simple way to keep sharing on schedule. (Hopefully, one day, Zoom will provide this functionality in their software.) For participants who join by telephone, the facilitator should give them a verbal “half-time” and “times up” message when needed.
Facilitators also need a way to track the time remaining in their breakout room, so they can ensure their room will finish as close as possible to the agreed upon time for all rooms.
Each scribe needs access to a place to scribe the responses to the second of The Three Questions: (the topics, issues, and challenges that participants want and need). Any online shared document can be used for this.
Here’s an example of a topic list created at a technical conference.
Three Questions facilitator training
Ask your facilitators to read Chapter 18 of Event Crowdsourcing or Chapters 31 & 32 of The Power of Participation so they are familiar with running The Three Questions. Decide on the sharing time, typically around 2 minutes, for each participant. Communicate it to the facilitators, so they will all be able to end their session at approximately the same time. Because all Zoom breakout rooms close at the same time, emphasize that time keeping is important, so that all participants get to share and everyone has the same time.
Three Questions scribe training
Explain to the scribes that their job is to record concisely the topics, issues, and challenges that participants share in response to the Second Question only. Introduce each scribe to their session scribing partner, and have them decide who scribes for the first sharer. Give your scribes the link to the shared online document in advance. Ask them to practice entering a few topics before their session starts.
When using a shared Google Doc, editors are assigned arbitrary names, shown in color during editing. It can be helpful for two scribes in the same session to learn each other’s assigned name before the session starts, so they can check on what their partner is writing.
Scribes can be participants too — when there are two scribes per session, one can scribe topics for the other’s sharing. Suggest that scribes alternate scribing for participants: one for the first participant, the other for the second, and so on.
If a topic is mentioned for which one or more participants have expertise and/or experience (the answer to the Third Question) it can be helpful to make a note of their names so they can potentially tapped as leaders or facilitators for the main conference breakout sessions.
It’s likely that some topics will be suggested in more than one of the separate Three Questions breakouts, or by several people in the same session. Since all scribes will be using the same Google Doc, it’s helpful for scribes to keep an eye on all the topics that are appearing during the breakouts. For a repeated topic, scribes can add an “x” at the end of the original topic line each time. Sometimes the topic will be similar but not the same as another topic. In this case it should be entered as a new item.
Running The Three Questions in Zoom Breakout Rooms
Before running The Three Questions, assign facilitators and scribes to specific numbered breakout rooms. Remember that breakout room assignments will be random. The main group facilitator or another designated staffer should, therefore, promptly move facilitators and scribes to the correct number room as soon as the rooms open. (See the section “Preparing breakout rooms” here to learn how to do this.)
At this point you’ll have a set of Zoom Breakout Rooms, each populated by an equal number of participants and a trained facilitator and scribe(s). Have everyone mute their audio except the facilitator and scribes.
Determining who shares next
During seated face-to-face meetings, it’s easy to keep track of who has or hasn’t yet shared by their location in the room. Online, it’s harder to track who hasn’t yet shared without a little help. (Don’t assume that a gallery view of participants will remain unchanged throughout the session; the display changes unpredictably if participants arrive or depart.)
Consequently, the facilitator should choose who shares next. (See this post for more information on “who goes next?” process.) To do this, each Three Questions facilitator must have their participants list visible. They then call on participants in turn, maintaining a written list of those who have shared. If the facilitator has a printer, track people who have shared on a printed screen shot of the attendee list.
Because people may join a session late, the facilitator should always check that everyone has shared.
Individual sharing
As each person shares, the Three Questions facilitator monitors their progress. If they are spending too much time on the First Question, let them know. It’s helpful to let sharers know when half their time is up, at which point they should be well into their answer to the Second Question.
If many people aren’t using their full time, point this out and encourage participants to say a little more. (But don’t insist that anyone share more than they originally offer.)
It’s a facilitator’s job to prevent people sharing too long, ensuring that everyone gets an equal amount of time to contribute.
When sharing in a Three Questions breakout is complete
When everyone in a Three Questions breakout has shared, there should be some free time left in the session. If desired, the session facilitator can solicit additional short expressions of interest in the uncovered topics, and perhaps suggestions of additional topics sparked by what has been heard in the group.
Each Three Questions facilitator should let the meeting facilitator know (typically by private message in Zoom’s text chat) when their session is over. The meeting facilitator can then close the breakout rooms once all breakouts are complete.
Participants will have met a useful number of other participants and learned useful information about each other, namely, details of their association with the meeting topic, their wants and needs for the meeting, and their relevant expertise and experience.
Conference organizers will have a comprehensive list of topics, issues, and challenges that are top-of-mind for attendees, plus identified participants who can facilitate/lead/present on them.
Conclusion
So far, in the first three posts of this series on participant-driven breakouts in Zoom, I’ve:
provided a brief recap of the benefits of peer conferences;
given a big picture overview of how you can hold one online;
explained how to prepare to run The Three Questions online in Zoom; and
covered how to run The Three Questions online in Zoom.
The next post (Part 4) will describe in detail how to carry out step #2 — creating an optimum conference program from the information uncovered in step #1— using Zoom.
Part 1 (an overview of what’s involved in implementing participant-driven breakouts in Zoom) is available here.
Part 2 (preparing for The Three Questions) is available here.
Parts 4 and 5 are now available.
Check back on this blog for future posts on implementing participant-driven breakouts in Zoom. To ensure you don’t miss the rest of the series, subscribe.
Part 1 of this series of posts gave an overview of what’s involved in implementing participant-driven breakouts in Zoom. Read it before diving into this post!
In this post (Part 2) I’ll cover most of Step #1 of the previous post: preparing for The Three Questions using Zoom breakout rooms.
If necessary, get familiar with Zoom, including breakout room functions, before proceeding. I’ve included links to the relevant Zoom tutorials and reference articles, when appropriate, in the following instructions. Once you’ve done that, you’re ready to start creating participant-driven breakouts in Zoom.
What is The Three Questions, and why use it?
I developed The Three Questions in 1995 as a fundamental opening process for peer conferences. It’s described and explained in all three of my books. You can find the most detailed implementation in Chapter 18 of my 2019 book, Event Crowdsourcing.
The Three Questions is the most effective way I know to assist a group of people to get to know each other usefully, safely, and authentically. It’s quite different from the common but often artificial and awkward icebreaker approaches used in “team-building” and “getting-to-know-you” activities because it focuses on core information we want to know about the people we’re currently with: why they’re present, what they want to do/learn about/discuss, and what useful resources they possess.
Besides connecting people around their fundamental interests, The Three Questions is one of the best formats for discovering important topics, issues, and questions that were previously unknown to event organizers and a majority of the participants, as well as associated levels of interest.
Zoom’s key tool for effective active learning and connection — Breakout Rooms
Frequent and well-designed small group work is the key to creating active learning and connection at any meeting. Zoom’s tool for small group work is Breakout Rooms.
Zoom allows facilitators to speedily split a meeting into up to 50 separate sessions. Participants can be allocated to these separate sessions automatically or manually.
If you’re not familiar with breakout rooms, take time to review Zoom’s tutorials. Practice using them at small group meetings before employing them for a significant event!
Preparing for The Three Questions in Zoom
Learn about The Three Questions
First, read the detailed instructions on how to run The Three Questions which you’ll find in my books:
Event Crowdsourcing [2019] (Chapter 18) [recommended: most comprehensive and recent information]
The Power of Participation [2015] (Chapters 31 & 32)
Conferences That Work [2009] (Chapter 25, pages 260-265)
Decide on the number and size of your Three Questions breakout groups
Next, decide the number and size of your breakout groups. This will depend on:
the number of attendees;
the duration and scheduling of your conference; and
the time you plan to devote to The Three Questions.
As I’ve written elsewhere, these days, most meetings are small meetings (less than 100 attendees) and that’s a good thing! So the following barebones examples offer suggestions for online conferences with up to 100 attendees. They don’t include a closing session, which I recommend — I’ll make suggestions for appropriate formats in a later post.
With care, more staffing, and a beefier Zoom license, The Three Questions can definitely be run successfully at larger online events.
Example 1: 60 attendees, ~4½ hour event (includes ~75 minutes of breaks), two one-hour breakouts with three simultaneous sessions per slot (six peer sessions)
Suggested schedule:
Five minutes for the welcome.
Fifteen minutes to explain The Three Questions, for attendees to write their answers, and divide attendees into three breakout rooms with 20 people in each.
One hour for each (simultaneous) Breakout Room for The Three Questions; two minutes sharing per person, with a five-minute break after 30 minutes.
Fifty minutes for conference organizers to build the nine-session conference program and set up Breakout Rooms for the resulting sessions. See the Part 1 post for attendee options during this time.
Ten minutes for attendees to review the program and decide which session to attend.
One hour for the first set of peer sessions.
Ten-minute break.
One hour for the second set of peer sessions.
(Optional, but recommended) Closing session; for example some form of Plus/Delta.
Example 2: 100 attendees, ~6½ hour event (includes ~140 minutes of breaks), three one-hour breakouts with four simultaneous sessions per slot (twelve peer sessions)
Suggested schedule:
Five minutes for the welcome.
Fifteen minutes to explain The Three Questions, for attendees to write their answers, and divide attendees into five breakout rooms with 20 people in each.
One hour for each (simultaneous) Breakout Room for The Three Questions; two minutes sharing per person, with a five-minute break after 30 minutes.
Ninety minutes for conference organizers to build the twelve-session conference program and set up Breakout Rooms for the resulting sessions. See the Part 1 post for attendee options during this time.
Fifteen minutes for attendees to review the program and decide which session to attend.
One hour for the first set of peer sessions.
Fifteen-minute break.
One hour for the second set of peer sessions.
Fifteen-minute break.
One hour for the second set of peer sessions.
(Optional, but recommended) Closing session; for example some form of Plus/Delta.
Both of the above examples allow each participant ~2 – 2½ minutes to share their answers to The Three Questions with their groups. As described in my books, when calculating sharing duration add at least ten seconds per participant for the inevitable pauses between shares.
If you want to adjust the time allocated to The Three Questions, you can adjust the size of the breakout groups and/or the sharing time for each participant. But don’t stray too far from the suggested parameters of the above examples. And don’t forget to include breaks!
If at the start of the event, the number of participants turns out to be significantly different from what was expected, facilitators should be ready to collectively adjust sharing time so that the total sharing still fits comfortably into the scheduled Three Questions session length. Each Three Questions breakout should use the same sharing time per participant, so all breakouts can close at the same time.
Staffing an online Zoom peer conference
An experienced practitioner who’s familiar with Zoom can often handle the facilitation and technical support for very small meetings. Online Zoom peer conferences, however, require multiple staffers, who need to be identified and prepared in advance. Typically they will be set up as Zoom co-hosts. I recommend the following staffing:
At least one staffer handling technical issues: user support, muting/unmuting participants appropriately, assigning facilitators to their Three Questions rooms, and pre-assigning attendees to breakouts in Step #2.
A meeting facilitator, who introduces The Three Questions to the entire group. (This person can also be a facilitator for one of the Three Questions Breakout Rooms.)
A facilitator for each Three Questions Breakout Room, who keeps track of sharing time, and ensures the sharing runs smoothly.
One or two scribes for each Three Questions Breakout Room. (Two scribes will have a much easier task than one.) Ideally, scribes should have some conference topic experience so they can summarize attendee responses accurately and concisely. During each Three Questions session, scribes summarize answers to the second question, usually in a shared Google Doc.
A small group of subject matter experts who will review the topics, issues, and challenges uncovered in Step #1, build a responsive peer session program, find leaders for each peer session breakout, and publish the resulting program.
Each peer session will need one or more participants who lead and/or share useful experience or expertise and/or facilitate the session.
As for any conference, adequate preparation and, if needed, training, for meeting staffers is crucial for a smoothly run event. Until everyone involved is experienced in supporting online meetings, a pre-meeting mock run-through on Zoom is strongly recommended!
Preparing attendees for a peer conference
At in-person meetings, facilitation via verbal directions works well. Because online participants can be more easily distracted or late, I recommend distributing a short preparatory online document for participants to read before the meeting.
Be sure to communicate in advance the importance of being present at the start of The Three Questions. The document should contain a short explanation of the value and format of a peer conference and a schedule. You don’t need to provide detailed information about The Three Questions. You can see some examples here and here.
The facilitator can share this document on-screen while introducing The Three Questions.
Introducing attendees to The Three Questions
One of the advantages of creating a peer conference online with Zoom is that participants don’t need to physically move to separate breakout rooms. At in-person events this takes time. Consequently, it’s simplest to introduce The Three Questions to attendees when they are all together in the main Zoom meeting room. Once the explanations are over, and participants have been given a few minutes to answer The Three Questions in writing, it’s easy to allocate them to their separate breakouts.
At the start of the peer conference, welcome attendees and then cover any housekeeping issues. Ask all attendees to turn on Zoom text chat, which supplies a useful way for facilitators, scribes, and participants to ask questions, and assist with format and technical issues. Also share links via screen share and/or text chat to the conference introductory document, and the online document that will contain participants’ responses to the second of The Three Questions: (the topics, issues, and challenges that participants want and need), as described in Part 3 of this series of posts.
The facilitator who introduces The Three Questions can use the same guidelines and scripts provided in my books, with the following minor variation. At the start of the introduction, ask attendees to have paper and pen available. Instead of passing out printed cards, the facilitator shares their screen, displaying a copy of The Three Questions card, and then introduces the exercise.
Allocating attendees to Zoom Breakout Rooms for The Three Questions
Once The Three Questions has been introduced, give attendees a few minutes of silent time to write down their answers. (As always, emphasize the importance of writing their answers.)
Once you’ve checked that attendees are ready to continue, it’s time to assign them to breakout rooms.
After creating the breakout rooms, click Options and make sure the following (and only the following) options are checked:
Move all participants into breakout rooms automatically.
Allow participants to return to the main session at any time.
Countdown after closing breakout rooms.
As soon as people are randomly allocated to their rooms, find your individual room facilitators and scribes on Zoom’s participant list and move them as needed to their correct room. (See the section “Preparing breakout rooms” here to learn how to do this.)
Congratulations! You’ve completed the major portion of Step #1. You’re well on your way to creating successful participant-driven breakouts in Zoom. Part 3 of this series covers how the breakout room facilitators run their Three Questions session.
Conclusion
So far, in the first two posts of this series, I’ve:
provided a brief recap of the benefits of peer conferences;
given a big-picture overview of how you can hold one online; and
explained how to prepare to run The Three Questions online using Zoom.
The next two posts will describe in detail how to:
run The Three Questions online (Part 3); and
carry out step #2 — creating an optimum conference program from the information uncovered in step #1— using Zoom (Part 4).
Part 1 (an overview of what’s involved in implementing participant-driven breakouts in Zoom) is available here, and Part 3 (how to run The Three Questions) is now available here.
Part 4 (how to process participants’ sharing to create an optimum conference program) is now available here, and Part 5 (how to run participant-driven breakouts in Zoom breakout rooms) is now available here.
Check back on this blog for these posts on implementing participant-driven breakouts in Zoom. To ensure you don’t miss them, subscribe to this blog.
Why implement participant-driven breakouts in Zoom?
I’ve been designing and facilitating participant-driven and participation-rich in-person meetings — aka peer conferences — for almost thirty years. Why? Because participants love these meetings!
Now the COVID-19 pandemic has forced meetings online. Unfortunately, most online events are still using a traditional webinar/broadcast-style approach: presenters speaking for long periods, interspersed with chat-mediated Q&A.
Why Zoom?
Zoom has rapidly become the dominant platform for online meetings. Though there are many features that would make the platform better, it’s popular for good reason. Zoom:
has a well-chosen feature set;
is relatively easy to use; and
has proved very reliable despite the platform’s meteoric growth.
While Zoom is currently missing some functionality that would smooth the process flow, it’s already a viable platform for online peer conferences.
I started using Zoom in 2012, but since the pandemic began I’ve facilitated more Zoom meetings than the last seven years. And I’ve become intrigued with the possibilities of incorporating the peer processes developed for successful face-to-face meetings into online events.
I’ve written three books about why creating participation-rich conferences that deliver effective learning, connection, engagement, and action is so important, and how to do it for in-person events. So I won’t repeat myself here; read them for full details!
In-person meetings have vanished overnight. It’s time to implement what we’ve learned about great face-to-face meeting design and process into online meetings. Meetings will never be the same. When the pandemic is over, the meeting industry will have much more experience and understanding of what is possible online versus in person.
My mission is to make meetings better for everyone involved. That’s why I’m publishing this series of posts on how to implement participant-driven breakouts in Zoom.
I’ll start with an overview.
The big picture
The core reason why peer conferences work is that they become what participants actually want and need. They accomplish this in real-time — during the event — via two essential steps:
At the start of the conference, uncover participants’ wants and needs and the resources in the room.
Develop an optimum conference program that matches the uncovered wants and needs with the resources in the room.
Once the conference program has been developed and scheduled, you’re ready to hold the resulting peer sessions. I’ll explain how to do this in a future post.
As in face-to-face events, I recommend allocating at least ninety minutes for step #1. If you are running an extended event (see below) with multiple sets of breakout sessions, schedule two hours. Note that these times include short breaks, as described in this post.
At the end of step #1:
Participants will have met a useful number of other participants and learned useful information about each other, namely, details of their association with the meeting topic, their wants and needs for the meeting, and their relevant expertise and experience.
Conference organizers will have a comprehensive list of topics, issues, and challenges that are top-of-mind for attendees, plus identified participants who can facilitate/lead/present on them.
Step #2
Step #1 generates a large amount of information about attendees’ real-time wants and needs, as well as relevant expertise and experience that can be tapped.
During step #2, conference leaders and subject matter experts use this information to create an optimum conference program. In Part 3 of this post, I’ll explain how to do this. What’s important to know is that step #2 takes time!
For a small meeting (e.g., 60 people, two one-hour time slots with three simultaneous sessions per slot ==> 6 peer sessions), creating the program might take 30 – 60 minutes.
For a larger event (e.g., 100 people, three one-hour time slots with five simultaneous sessions per slot ==> 15 peer sessions,) choosing a program might take 90 – 150 minutes.
Regardless of the time needed, conference attendees should be otherwise engaged during step #2.
You have (at least) three options at this point.
Allow attendees free time while the conference program is designed
One option is to schedule an attendee break that’s long enough to complete step #2. For example, if your attendees are from the same or contiguous time zones, consider scheduling step #1 so it ends around lunchtime for most of them. Your pre-conference schedule could then include an hour or more break for lunch while the program is developed.
Schedule a presentation for attendees during step #2
While conference leaders and subject matter experts are using step #1 information to choose and schedule peer sessions, the other participants attend a pre-scheduled presentation or session of some kind that’s long enough for step #1 to be completed.
Be sure to include at least a short break between the end of step #1 and the start of the presentation.
One minor drawback of this approach is that step #1 often involves checking the availability of participants who have relevant experience or expertise to lead a peer session, as well as their willingness to do so. Doing this (typically by private message in Zoom text chat) while these participants are involved in another session can be a little disruptive.
Schedule steps #1 and #2 on different days
A third option is to schedule your entire event over two or more days. This gives ample time for step #1 to be completed. For example, you could run step #1 for a couple of hours on Monday morning or afternoon, then complete step #2 and distribute the resulting conference program, and run the resulting peer sessions on Tuesday.
Conclusion
In this post, I’ve provided a brief recap of the benefits of peer conferences, and given a big-picture overview of how you can hold one online. Future posts will cover detailed descriptions of how to carry out steps #1 and #2 using Zoom.
Check back on this blog for upcoming posts on implementing participant-driven breakouts in Zoom. To ensure you don’t miss them, subscribe.
Destroy the conference to save it! When mistaken beliefs about methods and outcomes harden into dogma, harm follows. The professional meeting industry largely believes that:

 Not long ago, I designed and facilitated an online workshop that was marred by technical difficulties. The workshop was several hours long, and some (but not all) of the participants reported that my video feed froze at times. Luckily, my audio feed was fine.
 All too often, clients planning an event don’t spend enough time making hard but important event choices.
 (In case you were wondering, interviewees could choose more than one option.)
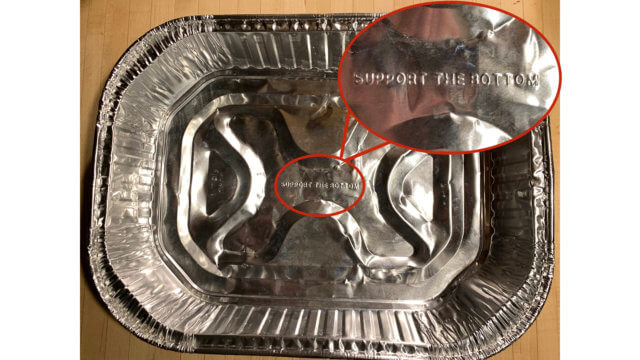

 1: Click on Participants in the Zoom toolbar at the bottom of your screen.
 3: Tap Rename, enter your desired new name, and tap Done.
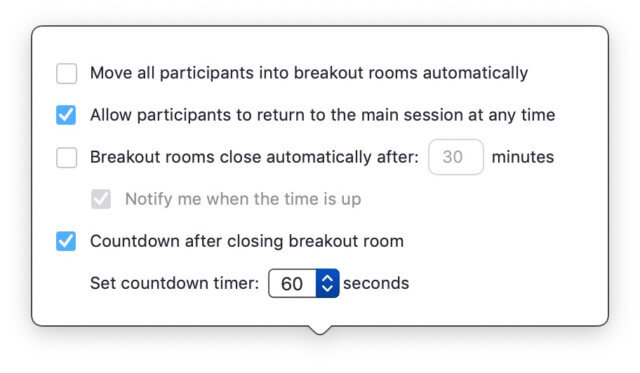 You’re ready to start the set of peer sessions! Tell participants they are about to be moved to their desired session and click Open All Rooms.
 Part 1
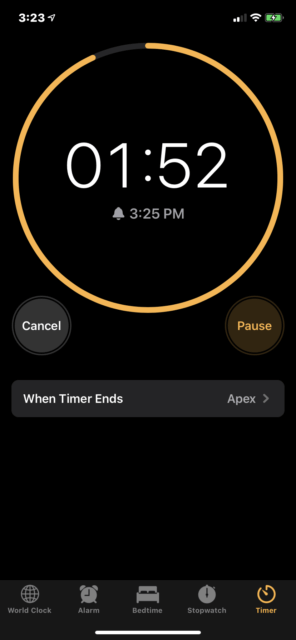
 Why implement participant-driven breakouts in Zoom?
 When mistaken beliefs about methods and outcomes harden into dogma, harm follows. The professional meeting industry largely believes that: